Streamlined sample-based instrument platform
Floe lets you find, perform and transform sounds from sample libraries — from realistic instruments to synthesised tones. Handmade with care, Floe is no-hassle, open-source and always free.
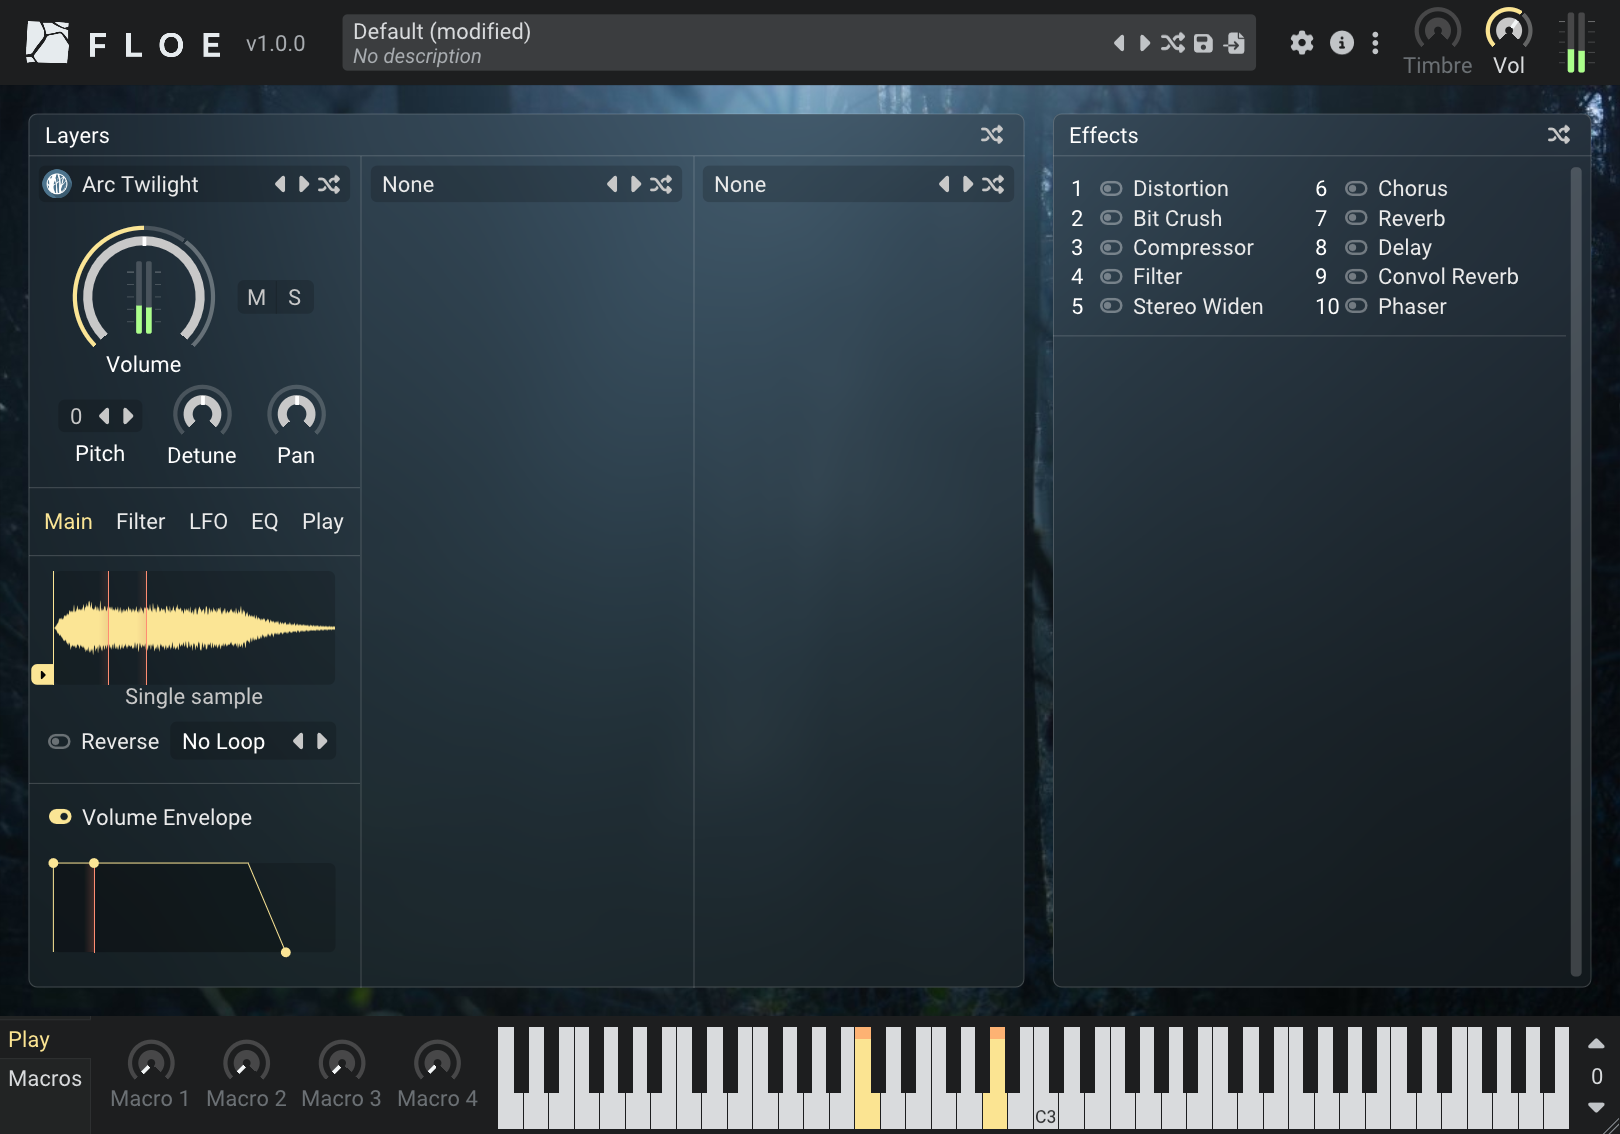
Find the right sound quickly
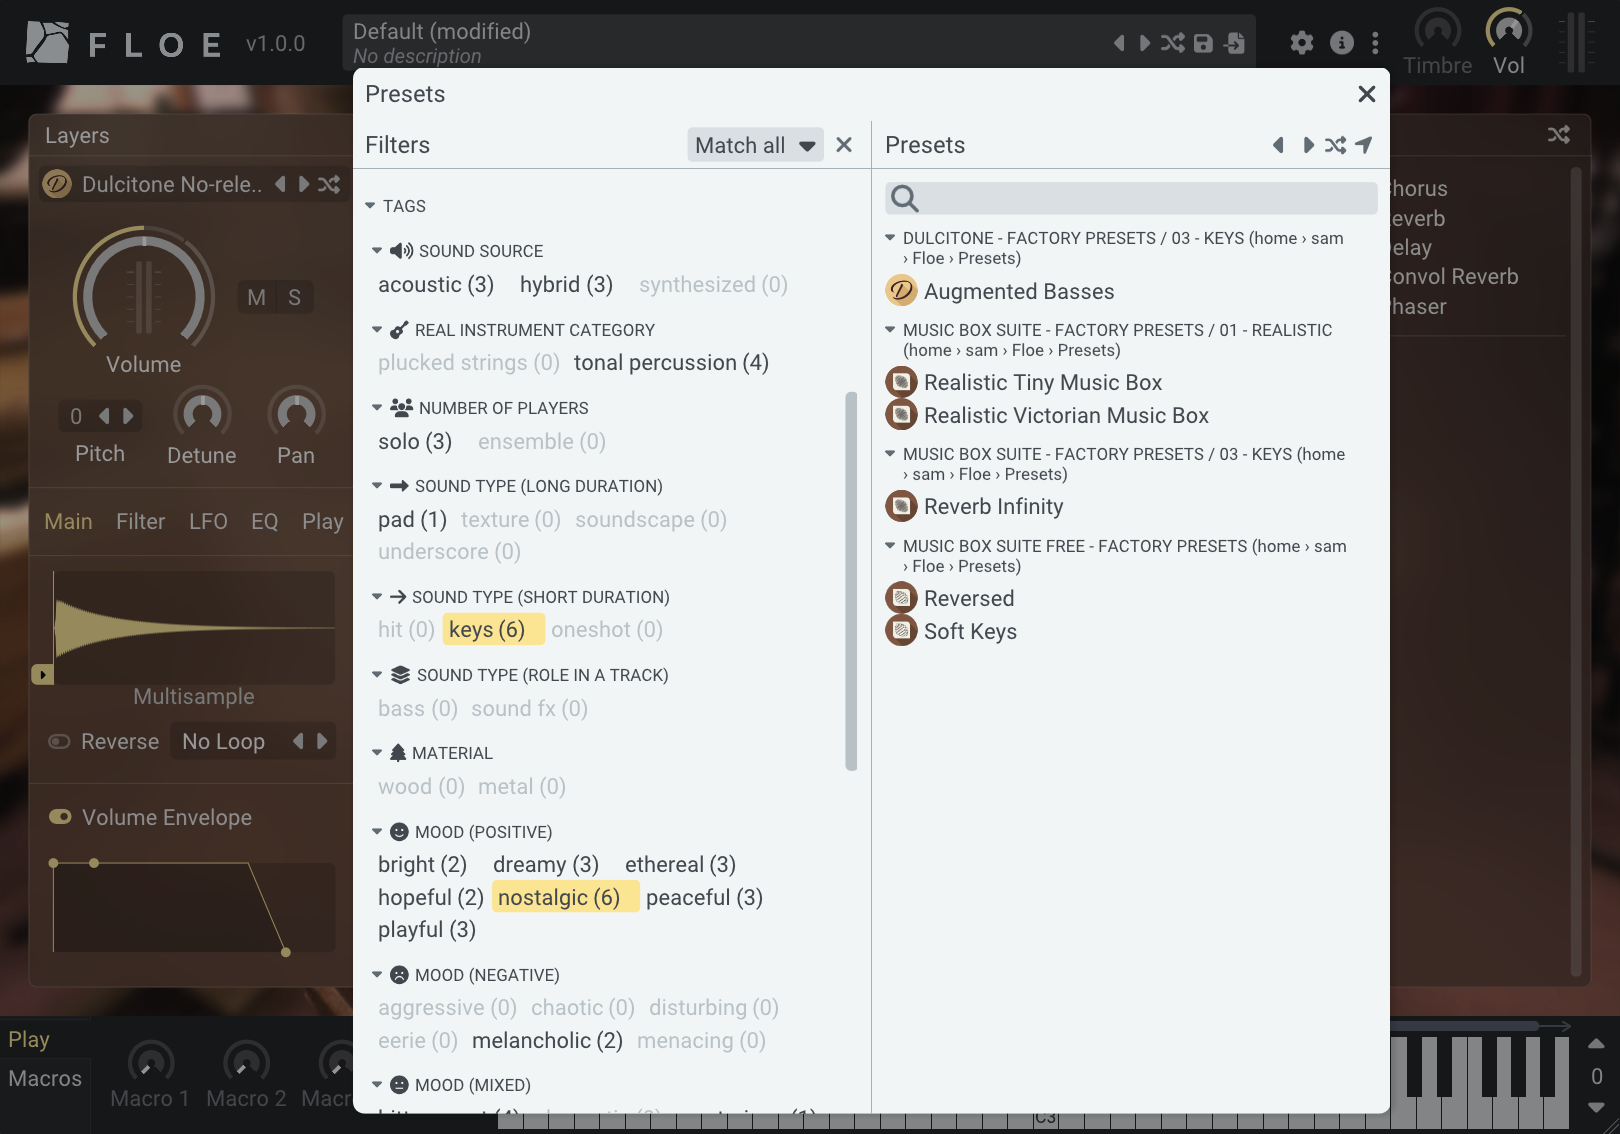
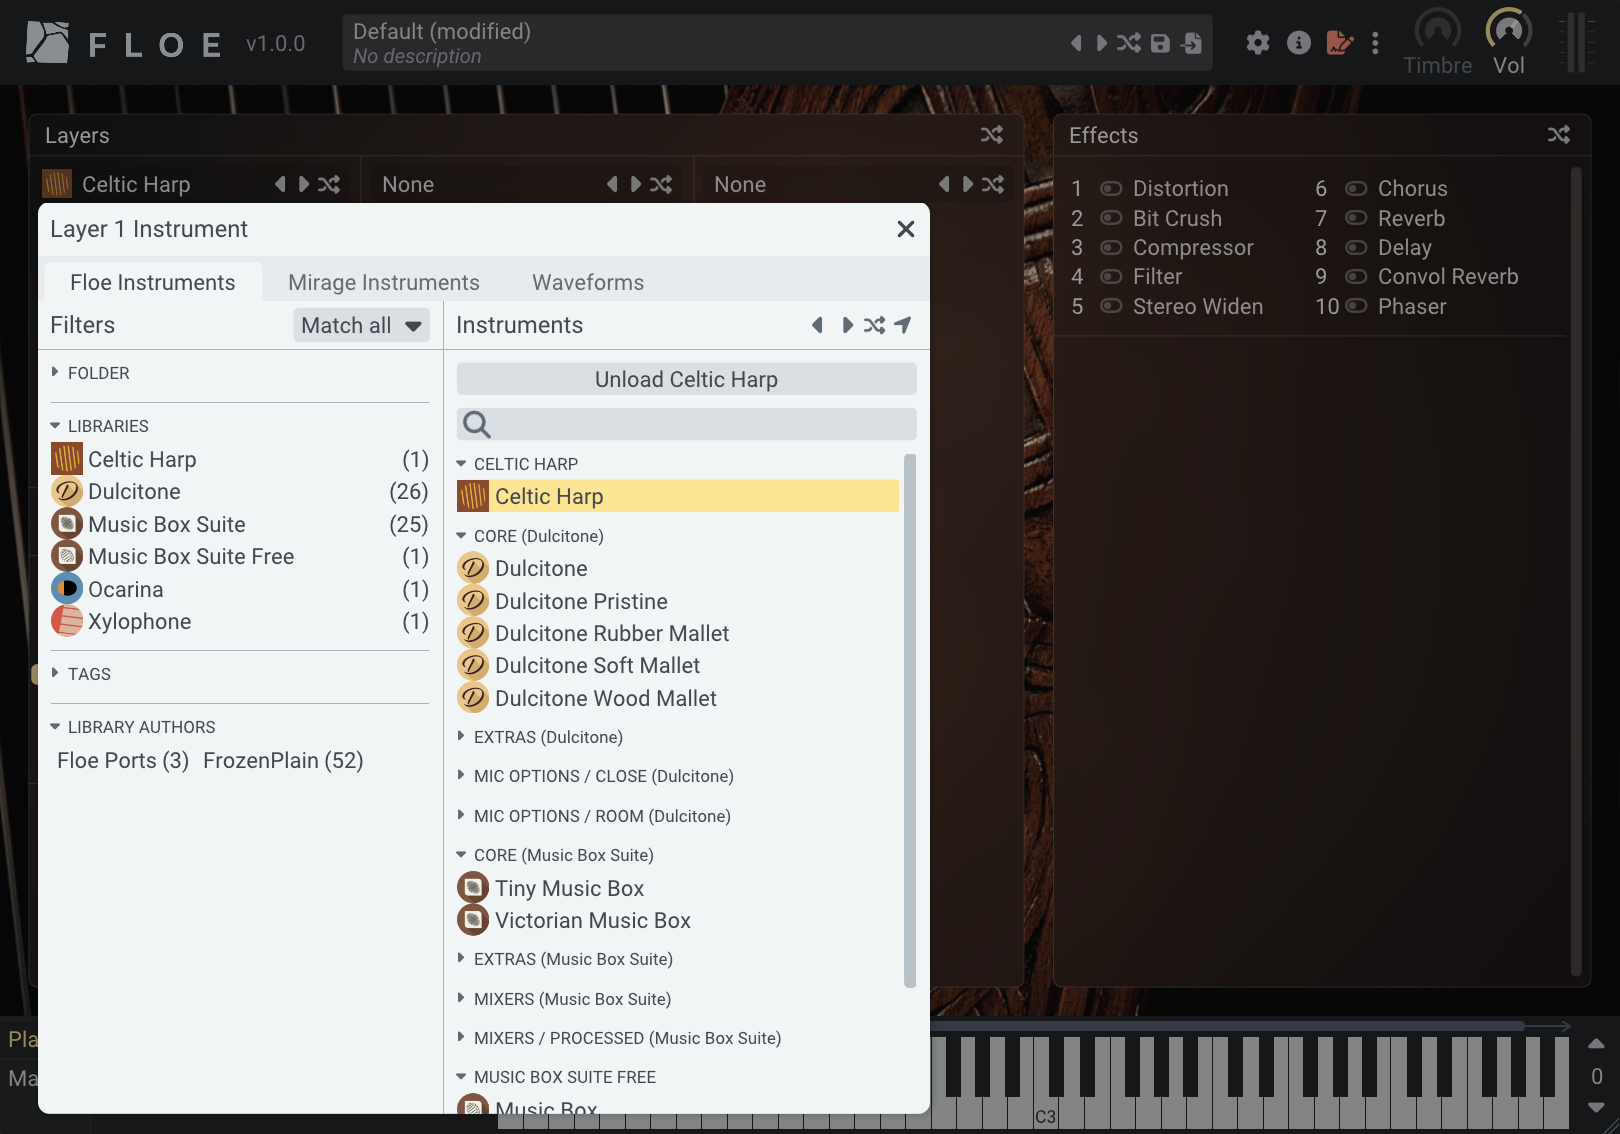
Floe’s intuitive browsing system works across all your Floe sample libraries, bringing together instruments and presets through extensive categories, standardised tags (by mood, timbre, type, etc.), and search. The sound you need is always a few clicks away.
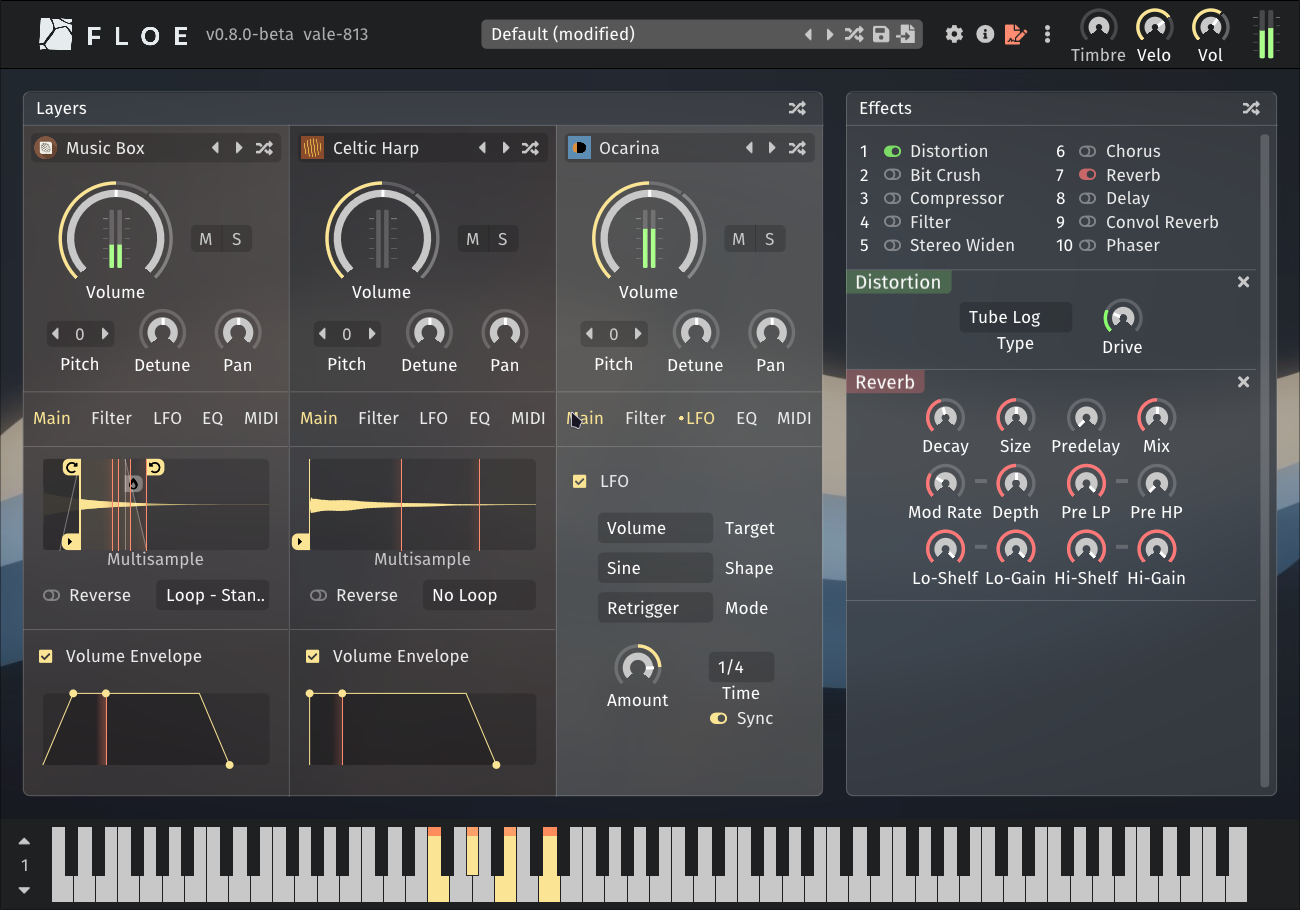
Transform sounds
With three distinct layers, Floe lets you blend instruments across different libraries. Transform sounds with loop and crossfade controls that bridge the gap between multisampling and synthesis. Process the sounds further with a rack of 10 built-in effects.
Focus on making music
Available as a plugin for your DAW (CLAP, VST3, and AU) on Windows, macOS and Linux. No accounts, no subscriptions, no interruptions — just musical creation. Openness is at the core of Floe and its libraries.
Expanding library selection
The list of libraries available for Floe is growing. And they’re installable in a few clicks. If you’re a developer, you can make your own libraries for Floe and request adding them to the list.
What makes Floe different?
Floe distinguishes itself through its hybrid sample-based synthesis approach, functioning more like a synthesiser that supports realistic multisampled instruments rather than just a sample player. Every library maintains a consistent, intuitive interface while offering powerful search capabilities, comprehensive preset systems, and macros that enable deep sound customisation.
The platform combines essential features like layers, envelopes, filters, and automation with a focus on extensibility and continuous improvement, all developed by someone passionate about the complete product experience who works directly with professional composers on feature development, UI design, and sound creation.
We take a different philosophical stance that might resonate with you: Floe is completely free and open source, with no accounts, online dependencies, or vendor lock-in. Your creativity belongs to you, not to a subscription service or cloud platform. While many sample library ecosystems become increasingly complex and intimidating, we prioritise accessibility and ease-of-use without sacrificing power.
Anyone can create libraries for the platform, and our commitment to backward compatibility means your investment in learning and using Floe will continue to pay dividends as we expand the feature set.
Handmade and open software
Handmade and detail-focused, Floe is a professional-grade tool available to everyone. It’s made by Sam Windell, who also runs a sample library development company: FrozenPlain.
Anyone can make libraries for Floe and contribute to the project. By consolidating our efforts into improving this engine, we improve the capabilities of all of its libraries for everyone.
Built on a solid foundation
Built on the proven architecture of FrozenPlain’s Mirage, used in professional productions for years, Floe is the next evolution, designed with careful attention to reliability and performance. We’re committed to further expanding its capabilities while maintaining backwards compatibility.
Already use Mirage? Read more about the transition to Floe.
A platform for sample library instruments
Floe is a platform for professional sample library products with these 2 key features:
- Ready-to-use presets (fine-tuned patches made using the library’s instruments)
- Direct access to sample-based instruments with sound-shaping tools for crafting your own variations: layering, looping, envelopes, effects, LFOs, macro-parameters, and more.
This makes Floe like a sample-based synthesizer or open ROMpler rather than a traditional sampler. For now, importing your own custom samples requires creating a sample library (programming required).
Floe supports both multisampled and single-sample instruments.
Your tools, your creativity
Floe is built as open-source software, meaning its code is freely available for anyone to see, modify, and improve (it’s GPL licensed).
While this might seem like a technical detail, it offers some potentially very valuable benefits. Any developer can pick it up and keep it running on future systems, ensuring longevity. If you need a specific feature, you could hire a developer to create your own customised version. Most importantly, open-source transparency builds trust — you or any community developer can verify that the program genuinely serves meaningful music creation rather than employing dubious business tactics.
About this website
This website contains everything you need to know about Floe. It’s presented in a book-like format, with chapters in the sidebar.
If you’re viewing this online, you might find the search feature useful: open it by clicking the magnifying glass icon at the top-left of the page. Additionally, there is a print icon at the top-right for either printing this book, or saving it to a PDF.
Requirements
Windows
On Windows, Floe is available in the CLAP and VST3 formats. We recommend using the CLAP version where possible. Requirements:
- Windows 10 or later
- 64-bit computer
- x86-64 processor with SSE2 support (almost all processors in a Windows PC since ~2006 have this)
- 64-bit CLAP or VST3 host
macOS
On macOS, Floe is available in the CLAP, VST3 and AU (v2) formats. We recommend using the CLAP version where possible. Requirements:
- macOS 11 (Big Sur) or later
- Apple Silicon or Intel
- CLAP, AU (v2) or VST3 host
Linux
On Linux, Floe is available in the CLAP and VST3 formats. We recommend using the CLAP version where possible. The requirements are quite minimal and you might find you already have everything you need. Requirements:
- x86-64 processor
- A reasonably recent distribution with glibc 2.29 or later
- libcurl, OpenGL, X11 and GLX libraries installed
zenityandxdg-openinstalled
Plugin Hosts (DAWs)
Here are some examples of plugin hosts that can run Floe. There are many more than this.
- CLAP hosts on Windows & macOS: Reaper, Bitwig, FL Studio (2024 or newer) and Studio One Pro (v7 or newer).
- VST3 hosts on Windows & macOS: Cubase, Ableton Live, Reason, and more.
- AU hosts on macOS include: Logic Pro, GarageBand, and more.
Not supported
Just for clarity: no ‘standalone’ application and no AAX (Pro Tools) support. We hope to expand Floe’s compatibility in the future.
Download & Install Floe
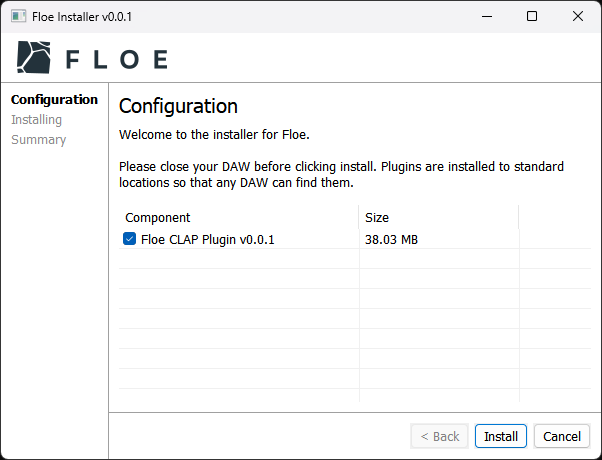
Current version: v1.0.6 • Requirements
Manual Installation (advanced)
Normally you'll want to use the installer, but there could be some cases where you'd prefer to install Floe manually. To allow for this, we provide a zip file that contains Floe's plugin files. Extract it and move the files to your plugin folders.
Floe Manual Install Windows:
Download Floe-Manual-Install-Windows.zip (41 MB)
- CLAP: Move
Floe.clapintoC:\Program Files\Common Files\CLAP - VST3: Move
Floe.vst3intoC:\Program Files\Common Files\VST3
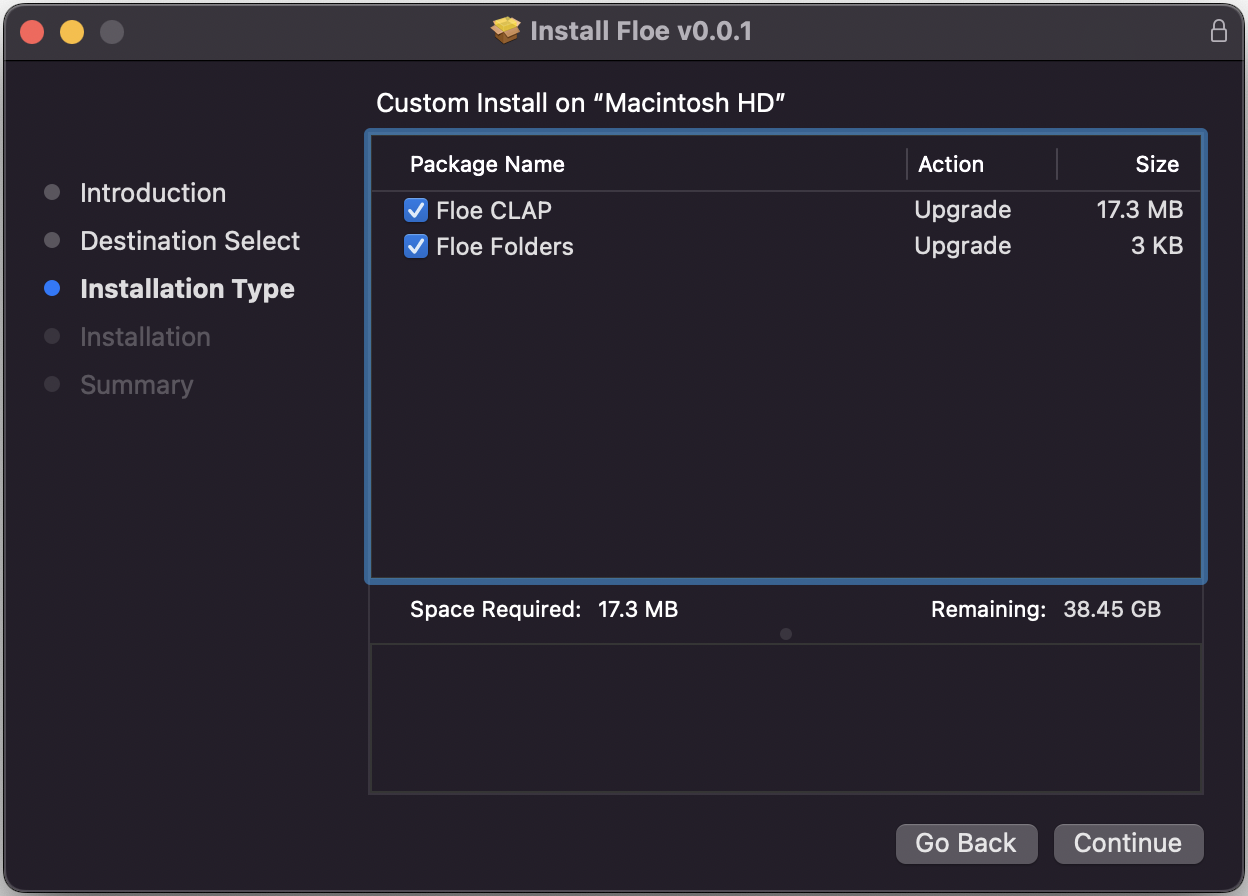
Current version: v1.0.6 • Requirements
Manual Installation (advanced)
Normally you'll want to use the installer, but there could be some cases where you'd prefer to install Floe manually. To allow for this, we provide a zip file that contains Floe's plugin files. Extract it and move the files to your plugin folders.
Floe Manual Install macOS Apple Silicon:
Download Floe-Manual-Install-macOS-Apple-Silicon.zip (52 MB)Floe Manual Install macOS Intel:
Download Floe-Manual-Install-macOS-Intel.zip (54 MB)
- CLAP: Move
Floe.clapinto/Library/Audio/Plug-Ins/CLAP - VST3: Move
Floe.vst3into/Library/Audio/Plug-Ins/VST3 - AU: Move
Floe.componentinto/Library/Audio/Plug-Ins/Components
Apple Silicon vs Intel
You must choose the right download for your machine. Most Macs since late 2020 use Apple Silicon chips (M1, M2, M3…) whereas most Macs before that use Intel chips. See Apple's documentation for more information.
Current version: v1.0.6 • Requirements
Run the following command in a terminal to install or update Floe.
For CLAP:
mkdir -p ~/.clap && curl -L https://github.com/floe-audio/Floe/releases/download/v1.0.6/Floe-CLAP-v1.0.6-Linux.tar.gz | tar -xzf - -C ~/.clapFor VST3:
mkdir -p ~/.vst3 && curl -L https://github.com/floe-audio/Floe/releases/download/v1.0.6/Floe-VST3-v1.0.6-Linux.tar.gz | tar -xzf - -C ~/.vst3Manual Installation (advanced)
Here's the download links if you want to install the plugins manually.
Floe Linux CLAP:
Download Floe-CLAP-Linux.tar.gz (19 MB)Floe Linux VST3:
Download Floe-VST3-Linux.tar.gz (22 MB)
- CLAP: Move
Floe.clapinto~/.clapor/usr/lib/clap - VST3: Move
Floe.vst3into~/.vst3or/usr/lib/vst3or/usr/local/lib/vst3
More Information
Download the installer for your operating system using the buttons above. Double-click the downloaded file to extract it, and then double-click the extracted installer file to run it. It will guide you through the installation process including choosing which plugin formats to install.
You can replace old versions with new ones and everything will continue to work.
To update Floe, just download and run the latest installer again.
What’s Next?
Install sample libraries and presets via packages.
Updates
Floe is an evolving project with frequent (optional) updates.
How to update
To update Floe, simply download and run the latest installer. It will replace the old version in a backwards-compatible way.
Alternatively, if you manually installed Floe, install the latest files - replacing the old ones.
Checking for updates
Floe can automatically check for available updates. It does this in a simple, non-intrusive way.
When a newer version is available, a red dot will appear on the info button in Floe’s window.
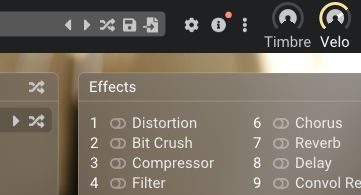
Clicking this will open the info panel and show you the options: ignore the update, or visit the download or changelog pages. Ignoring the update means the red dot will disappear until a newer version is available.
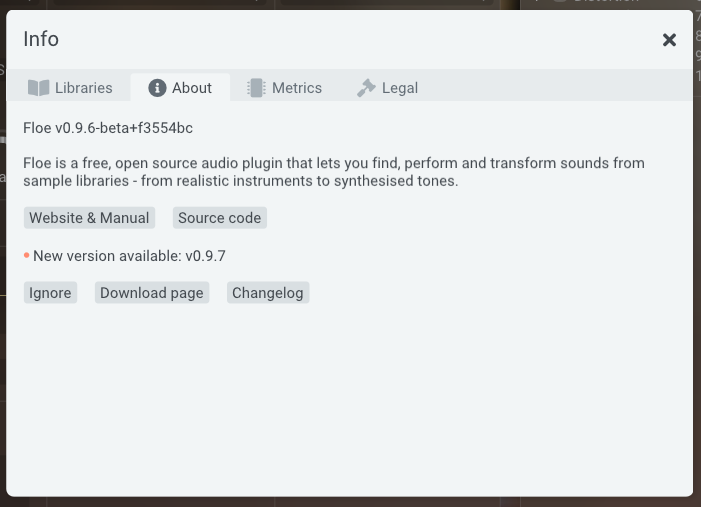
Disabling automatic update checks
You can disable automatic update checks by unchecking the “Check for updates” option in Floe’s preferences panel.
Uninstalling
Uninstall plugins
Windows
On Windows, Floe can be uninstalled using the standard method for uninstalling software, via the ‘Add or Remove Programs’ control panel. See the Windows documentation here.
Close your DAW before running the uninstaller.
This uninstalls Floe, but not libraries or presets. Follow the instructions below to delete libraries and presets.
This uninstaller also supports uninstalling Mirage, the predecessor to Floe.
macOS
We don’t have an uninstaller program for macOS. Please follow the manual uninstall instructions below.
Uninstall libraries and presets
All operating systems
- Open Floe
- Click on the cog icon at the top.
- Open the ‘Folders’ tab.
- For each of the paths click the ‘open folder’ icon: . This will open the folder in your file manager.
- Delete all files in the folder.
Repeat this for each folder in Floe preferences panel.
Manually uninstall plugins
Delete Floe
Floe consists of plugin files, and a preferences file. The preferences file is normally tiny: around 1 Kb in size. Plugins files are normally around 15 MB in size.
Delete the following files if they exist:
macOS
- Preferences:
/Users/Shared/Floe/Preferences/floe.ini - CLAP:
/Library/Audio/Plug-Ins/CLAP/Floe.clap - VST3:
/Library/Audio/Plug-Ins/VST3/Floe.vst3 - AU:
/Library/Audio/Plug-Ins/Components/Floe.component
Windows
For Windows, use the uninstaller program described above. If you want to manually delete Floe, delete the following files:
- Preferences:
C:\Users\Public\Floe\Preferences\floe.ini - CLAP:
C:\Program Files\Common Files\CLAP\Floe.clap - VST3:
C:\Program Files\Common Files\VST3\Floe.vst3
Linux
- Preferences:
~/Floe/Preferences/floe.ini - State:
~/.local/state/Floe - CLAP:
~/.clap/Floe.clap - VST3:
~/.vst3/Floe.vst3
Delete Mirage
If you used to have Mirage installed then some additional files may be present. To uninstall Mirage, delete the following files. Some of these files may not exist.
macOS
- Preferences:
/Library/Application Support/FrozenPlain/Mirage/Settings/mirage.json - Preferences (alternate):
/Users/<your-name>/Music/Audio Music Apps/Plug-In Settings/FrozenPlain/mirage.json - Preferences (alternate):
/Users/<your-name>/Library/Application Support/FrozenPlain/Mirage/Settings/mirage.json - VST2:
/Library/Audio/Plug-Ins/VST/Mirage.vst - AU:
/Library/Audio/Plug-Ins/Components/FrozenPlain Mirage.component
Windows
- Preferences:
C:\ProgramData\Mirage\Settings\mirage.json - Preferences (alternate):
C:\Users\<your-name>\AppData\Local\FrozenPlain\Mirage\mirage.json - VST2:
C:\Program Files\VSTPlugins\mirage64.dll - VST2 (alternate):
C:\Program Files\Steinberg\VSTPlugins\mirage64.dll - VST2 (alternate):
C:\Program Files\Common Files\VST2\mirage64.dll - VST2 (alternate):
C:\Program Files\Common Files\Steinberg\VST2\mirage64.dll
Packages
Sample libraries and presets are typically put into ZIP files called Floe packages. This makes them convenient for downloading and installing.
Floe can easily extract and install these packages.
The available packages page lists some of the packages available for download.
Additional Information
Packages are just normal ZIP files, but they contain subfolders in a particular structure that Floe knows how to handle.
Because they are just ZIP files, Floe is actually not required; you can unzip the package yourself and use the libraries for something unrelated to Floe if you wanted.
A package can contain any number of libraries and/or presets. Typically though, a package contains one library and a folder of factory presets for that library.
Just like the libraries and presets themselves, packages are portable - you can copy them to other computers or operating systems.
Installing Packages
Floe can install sample libraries and presets from ZIP files called Floe packages.
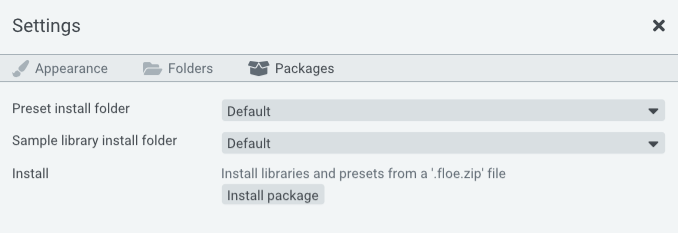
‘Install package’ button
At a glance
Download your package ZIP file(s). Don’t extract them. Instead, click the ‘Install package’ button in Floe’s Preferences panel. Direct it to the ZIP file.
Instructions
First, install Floe and open it in your DAW.
Download your chosen package(s) (ZIP files containing sample libraries and presets). Don’t extract them.
To install:
- Open Floe’s Preferences panel ( cog icon)
- Go to the Packages tab
- Click ‘Install package’ and select your ZIP file(s)
- Done - libraries/presets are immediately available
The package ZIP files can be deleted after installation. No restart required.
Mirage Compatibility
If the package is a Mirage library you will also need to install the Mirage Compatibility package. Download and install it the same way as the main package. Download Mirage Compatibility Package.zip.
Floe handles the details
Floe handles the installation process intelligently. It will check existing installations across all known folders, check for conflicts and handle upgrades. It will even detect if you’ve modified a library and give you the option to keep your modified version. It will ask you about skipping or overwriting if it needs too. It will never duplicate libraries unnecessarily.
Manually installing
Alternatively, you can manually install libraries and presets by extracting the ZIP file into the correct folders.
- Extract the package ZIP file.
- Open Floe.
- Open the Preferences panel using the gear icon at the top.
- Open the Folders tab.
- Here you can control which folders Floe looks for libraries and presets in. Copy/move the contents of this package’s Libraries into one of Floe’s library folders, and the same for Presets into one Floe’s presets folder.
- Done. No need to restart Floe.
Available Packages
Floe can install libraries and presets from ZIP files called Floe packages.
This page showcases packages to help you get started with Floe.
Floe Ports (free)
Floe Ports is the name we’ve given to the community project of converting high-quality libraries from other formats into Floe’s native format. Reach out if you want to help with this project, we’d love more presets for these libraries and more libraries converted.
For developers: Floe Ports libraries are available on Floe’s GitHub.
These are currently very basic.
They have just 1 instrument each and no presets.
| Name | Details | Download |
|---|---|---|
Celtic Harp by Floe Ports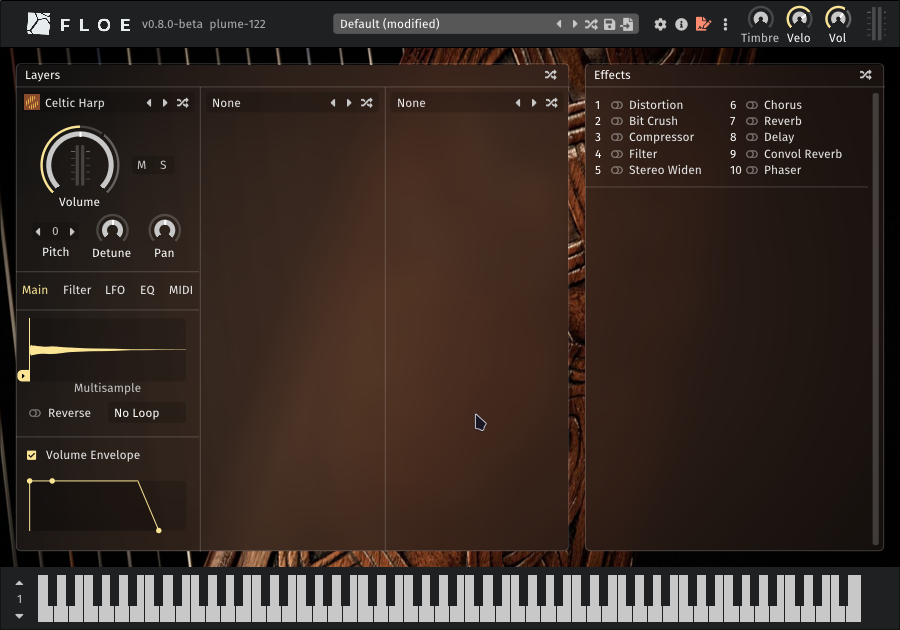 | High-quality multisampled harp with velocity layers and round robins. Port of Etherealwinds Harp 2: Community Edition by Versilian Studios. 1 instrument, CC-BY (attribution required) | Download Package (120.4 MB) |
Xylophone by Floe Ports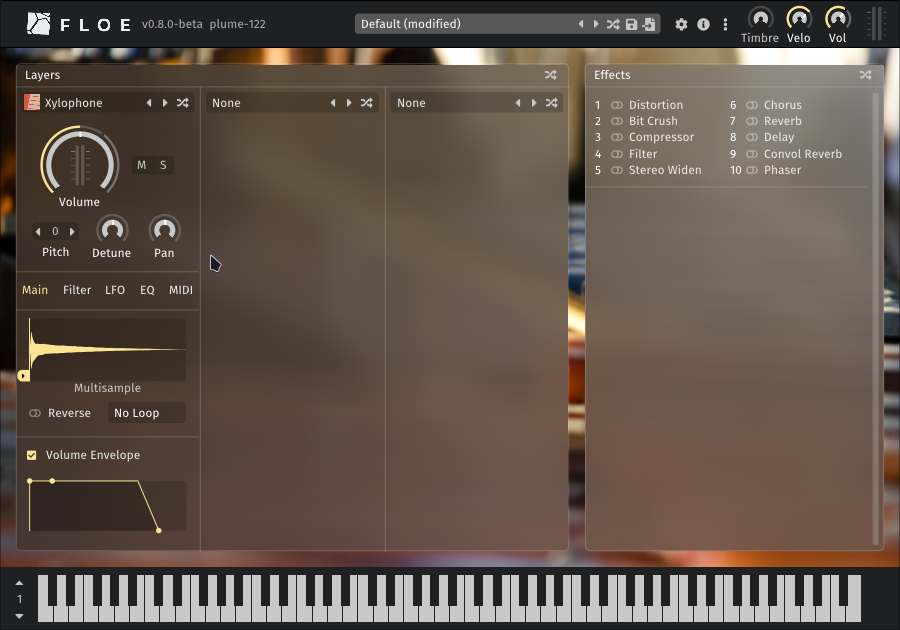 | Basic free multisampled xylophone from FreePats, converted into a Floe library. 1 instrument, public domain | Download Package (2.6 MB) |
Ocarina by Floe Ports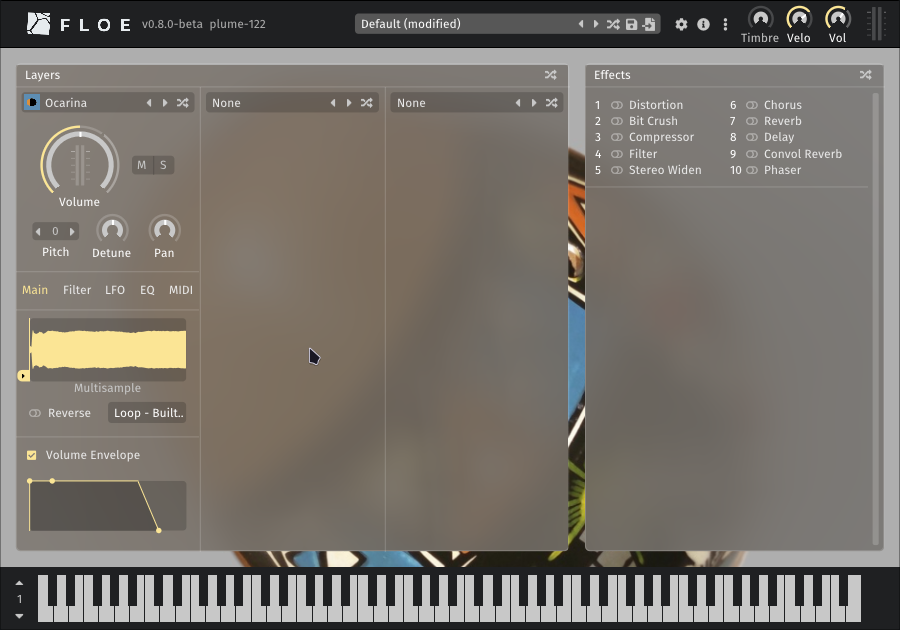 | Basic free ocarina from FreePats, converted into a Floe library. 1 instrument, public domain | Download Package (4.3 MB) |
Antique IRs by Floe Ports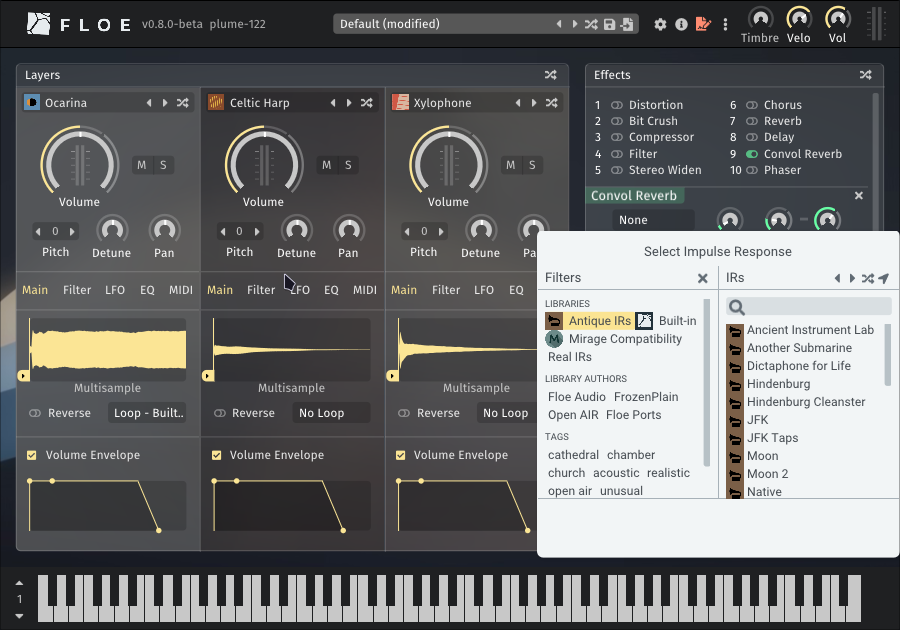 | Impulse responses simulating old audio equipment (dicta-phones, film reels, vintage vinyl, wax cylinders). Port of NoiseCollector’s library from public domain historical recordings. 27 impulse responses, public domain | Download Package (1.1 MB) |
FrozenPlain Libraries
Floe fully supports all libraries from FrozenPlain’s catalogue of professional sample libraries (except their Kontakt-format libraries).
| Name | Details | Download |
|---|---|---|
Music Box Suite Free by FrozenPlain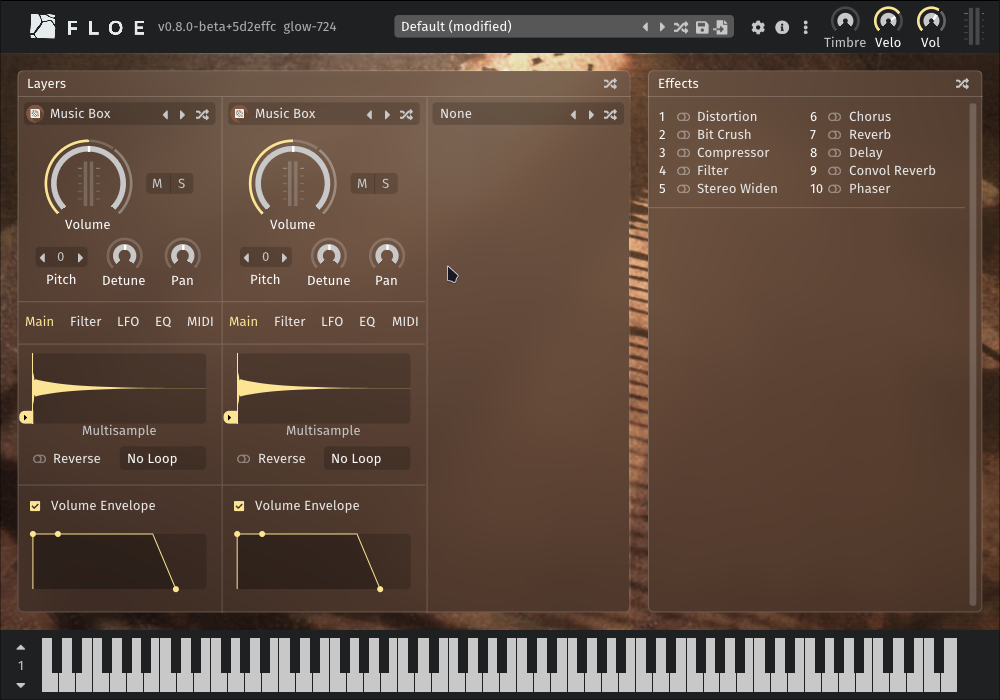 | Free multisampled music box from FrozenPlain. 1 instrument, 9 presets | Visit webpage → |
Professional Library Catalogue by FrozenPlain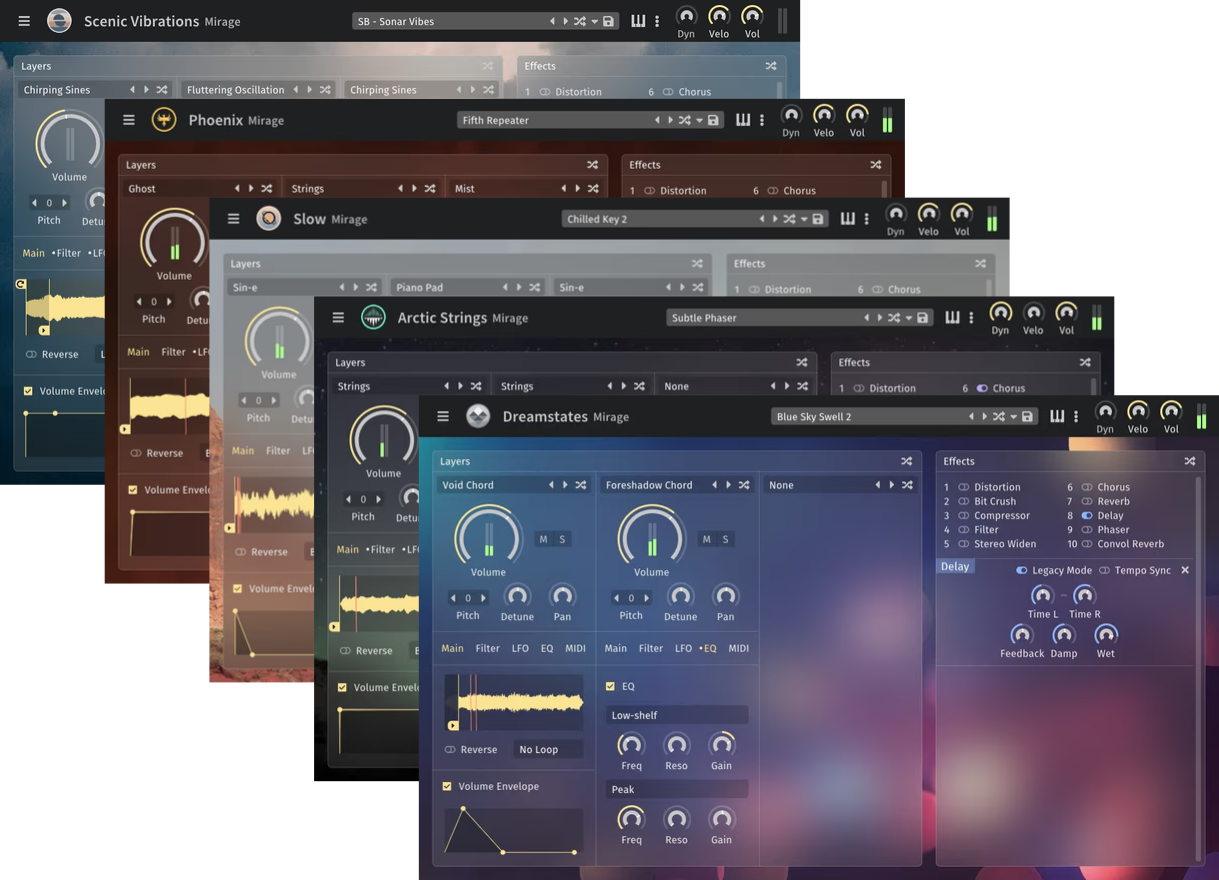 | Range of professional sample libraries covering ambient, cinematic, and sound design. (Paid products). | Browse FrozenPlain Libraries → |
| Mirage Compatibility by FrozenPlain | Required compatibility package for using FrozenPlain’s Mirage libraries inside Floe. | Download Package (8.9 MB) |
If you have a Floe package that you would like to be listed here, please get in touch.
Sample Libraries
Floe is an engine that requires Floe sample libraries to make sound. This page describes Floe’s sample library format and how to manage your libraries.
Related pages:
- Available libraries
- How to install libraries
- Develop your own libraries (programming required)
Floe also supports the legacy Mirage library format.
Custom open format
Floe sample libraries use a custom, open format consisting of a folder of audio files and a file in the Lua programming language called floe.lua.
The format supports both multisampled and single-sample instruments, as well as comprehensive tagging and categorisation features.
Access to the audio files gives you the freedom to use a library’s sounds in other software too.
Openness is a key goal of Floe sample libraries.
There’s no proprietary file formats. There’s just FLAC, WAV and Lua. By using widely-used file formats we ensure the longevity of libraries.
Portable
Sample libraries are just normal folders. They don’t reference anything outside their folder, meaning they totally portable; you can move libraries to other locations, or even to other computers/operating systems due to their cross-platform nature.
View installed libraries
You can view your installed libraries by clicking the info button on Floe’s main window.
Library folders
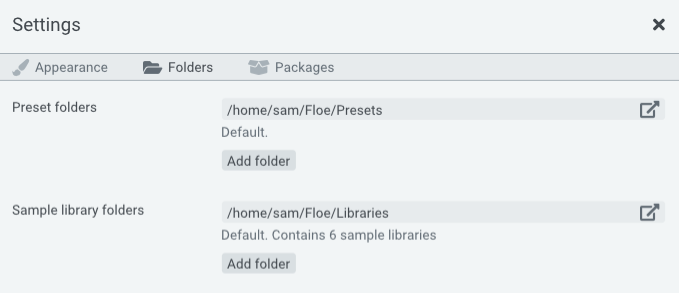
Floe automatically scans for sample libraries in a set of folders. You can configure these folders in Floe’s preferences panel, which is opened by clicking the cog icon at the top of Floe’s window. Subfolders are scanned too.
The default library folder cannot be removed, but you can add and remove any other folders you like.
Moving and rearranging libraries
You may rearrange your libraries within your folders as you see fit. Floe will automatically detect changes and apply them. For example, you might want to create subfolders for different types of libraries, or to separate libraries from different developers.
You can also move your existing libraries to another location, such as an external drive.
To do this, you will need to move the libraries in File Explorer/Finder, and then add the new location in Floe’s preferences.
Here’s that process in more detail:
- Create your new library folder at your desired location. For example, create “Floe Libraries” somewhere on your external drive.
- Open the Preferences panel by clicking the cog icon at the top of Floe’s window.
- Under ‘Folders’, click on the link button for the folder that you want to move libraries out of. A File Explorer/Finder window will open.
- Use File Explorer/Finder to move the libraries to your desired new location (libraries are folders — typically with this naming pattern: ‘Developer - Library-name’).
- Go back into Floe, and add the new location by clicking the ‘Add Folder’ button. Remember, Floe will find libraries inside subfolders as well as the top-level, so select the “Floe Libraries” folder (or whatever name you chose), instead of the individual library folders.
Presets
Floe can save its current state as a preset file, which can be loaded later. It’s the same file type regardless of what sample libraries you’re using (.floe-preset file).
When you load a preset, Floe will check that you have the required libraries installed, and if not, it will show an error.
Presets are portable - you can copy them to other computers or operating systems. Using your file explorer (Finder, File Explorer, etc.), you can rearrange presets into folders and rename them as you like. Floe automatically detects any changes in your preset folders updates its listings accordingly.
Preset browser
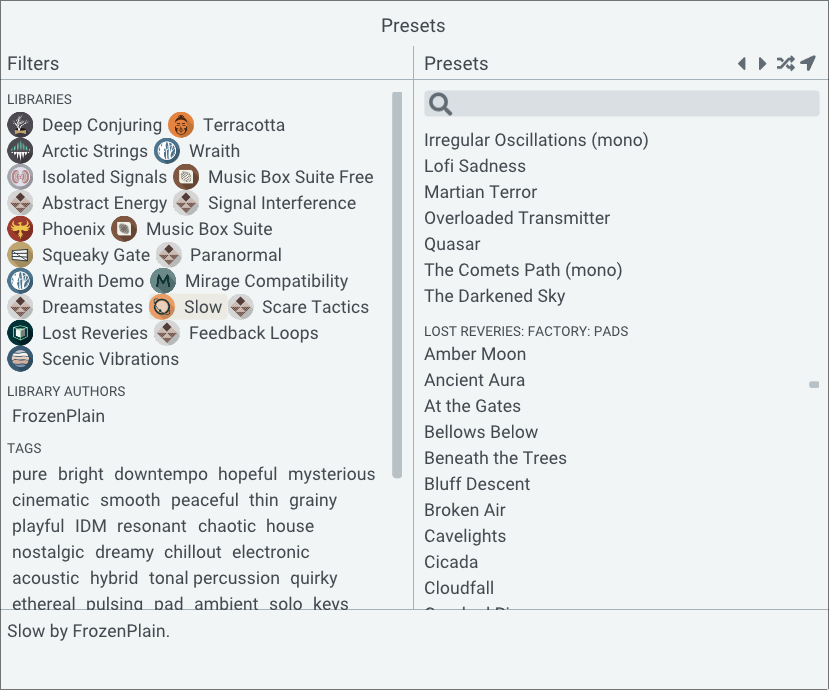
Floe features a browser for conveniently navigating and loading presets from your preset folders. Filter presets using the left-hand panel, and select presets from the right-hand panel. You can also search for presets using the search bar at the top.
Preset folders

Floe automatically scans for presets in a set of folders - including subfolders. This works in the exact same way as your library folders.
Presets are tiny files and so there’s typically no need to move then to an external hard-drive.
Layers
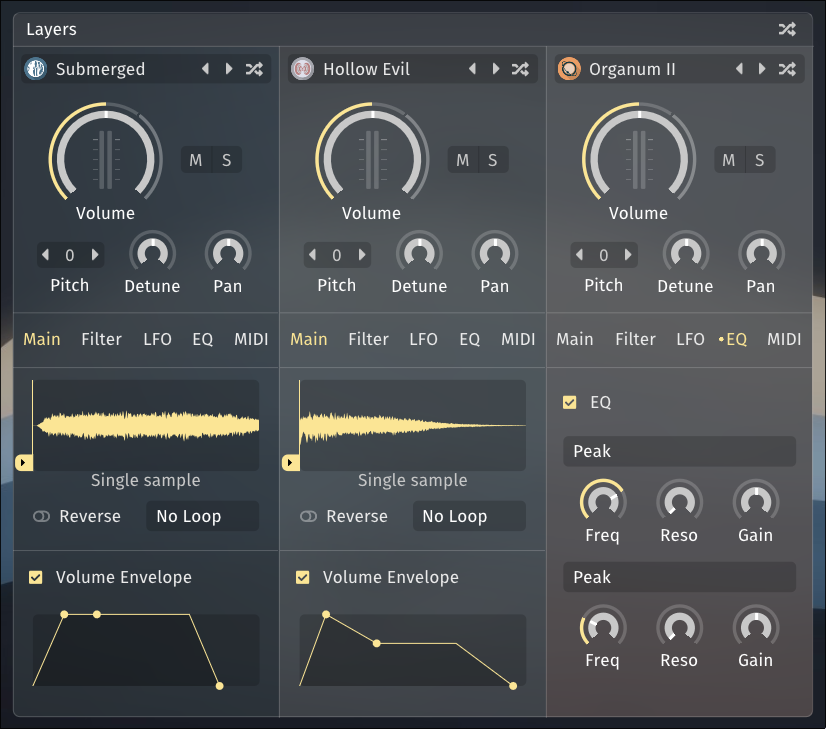
Floe is built around an architecture of three layers. These are displayed in three columns starting from the left of the main panel. Each layer is identical. Floe’s layers are the first things in the processing chain; each layer is processed in parallel, and then the three streams of audio are mixed together and fed through the effects rack, from top to bottom.
Instruments
Each layer can contain an instrument. The instrument is the sound generator. It’s like an oscillator in a traditional synthesizer. However, for Floe, instruments are sample-based. Sometimes an instrument is a realistic, complex multisampled real musical instrument, sometimes it’s a single looping sample. Floe also has a couple of basic synth waveforms designed for layering with other instruments.
To load an instrument, click the menu button at the top of the layer. Change it from ‘None’ to an instrument of your choice. You will be able to pick from any of the instruments that are available in the libraries that you have installed.
How an instrument works is defined in the library that it comes from. Most instrument allow for adding or customising sample loops.
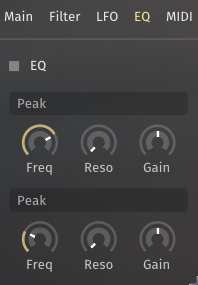
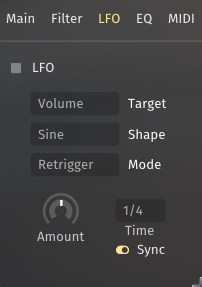
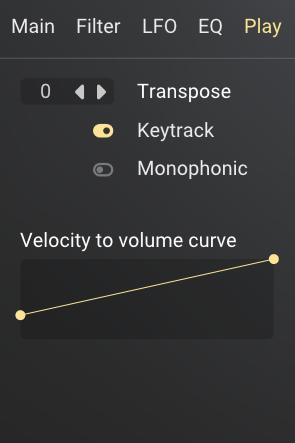
Sound shaping
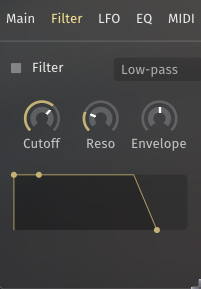
You can shape the sound of each layer in quite a few ways.
Effects
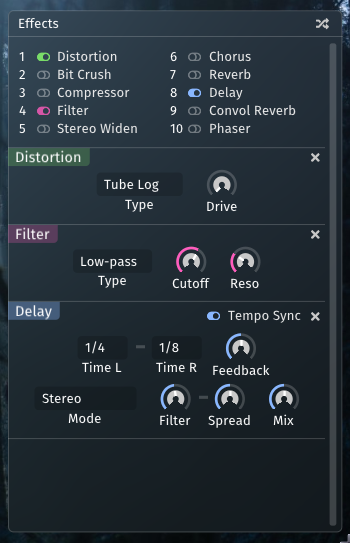
Floe has a selection of 10 effects that can be applied to the audio. These effects are applied to the mix of the three layers. The effects are shown in a list on the right-hand side of the main panel.
Reordering
You can change the ordering of the effects by dragging and dropping the effect names — either the name in the rack or the name next to the on/off switch.
Available effects
| Name | Description |
|---|---|
| Distortion | Distort the audio using various algorithms. |
| Bit Crush | Apply a lo-fi effect to the signal by either reducing the sample rate or by reducing the sample resolution. Doing either distorts the signal. |
| Compressor | Compress the signal to make the quiet sections louder. |
| Filter | Adjust the volume frequency bands in the signal, or cut out frequency bands altogether. The filter type can be selected with the menu. |
| Stereo Widen | Increase or decrease the stereo width of the signal. |
| Chorus | An effect that changes the character of the signal by adding a modulated and pitch-varying duplicate signal. |
| Reverb | Algorithmically simulate the reflections and reverberations of a real room. |
| Delay | Simulate an echo effect, as if the sound is reflecting off of a distant surface. |
| Convol Reverb | The Convolution reverb effect applies a reverb to the signal. The characteristic of the reverb is determined by the impulse response (IR). The IR can be selected from the menu. |
| Phaser | Modulate the sound using a series of moving filters |
Key Ranges
Key ranges let you split the keyboard into zones, with each layer responding to specific keys. This enables keyboard splits, layered zones, and smooth transitions between different sounds across the keyboard.
Setting up key ranges
Configure key ranges on each layer’s Play tab using the low and high key controls. Click and drag these handles to set the range that layer will respond to.

Fade controls let you create smooth transitions at the edges of key ranges. Set the number of notes that fade in at the start or fade out at the end of each range. This is used for creating seamless overlaps between layers.
For multisampled instruments in particular, consider using the Transpose parameter to change the pitch of the layer. This works by shifting the underlying mapping of samples so higher/lower samples are triggered as opposed to the standard pitch parameter which algorithmically re-pitches the sound.
Key range display
The key range display appears as a bar above the keyboard at the bottom of the interface. It shows which keys trigger each layer, with colours corresponding to each layer. The display is hidden when all layers use the full keyboard range (C-2 to G8).

Navigation: Since 128 MIDI keys can’t fit on screen, the keyboard shows a scrollable section. Use the octave scroll buttons or drag the octave number to navigate. The key range display scrolls with the keyboard.
Layer visibility: Only layers with loaded instruments appear in the display. Empty layers are not shown.
Visual elements
Off-screen indicators: Small chevrons show when a range extends beyond the visible keyboard area. Scroll to see the full range.

End markers: Vertical lines mark the boundaries of each key range, moving as you adjust the range settings.

Enlarged view: Hover over the display to see an enlarged view with more detail.

Named ranges: Sample library developers can define named ranges for instruments (like drum names or natural vs. extended ranges). These appear as thicker capsules with labels visible in the enlarged view.

Fade visualisation: Gradients show fade-in and fade-out areas, with more transparency indicating lower volume.

MIDI
Map parameters to MIDI CC
All automatable parameters in Floe can be assigned to a MIDI CC. This allows you to control Floe from a MIDI controller for example.
To do this, right-click on the parameter you want to assign, and select ‘MIDI Learn’. Then move the control on your MIDI controller that you want to assign to that parameter. This will create a mapping between the parameter and the MIDI CC.
You can remove this mapping by right-clicking on the parameter and selecting ‘Remove MIDI Learn’.
This mapping is saved with your DAW project. But it’s not permanent. It only applies to the current instance of Floe in your DAW, and it won’t be the applied if you load a new instance of Floe.
Preset files do not save MIDI CC mappings. So you can load presets and your MIDI CC mappings will remain.

Make MIDI CC mapping more permanent
You can make the MIDI CC mapping more permanent by right clicking on a ‘MIDI learned’ parameter and selecting ‘Always set MIDI CC to this when Floe opens’. As the name suggests, when you open Floe, the MIDI CC mapping will be added.
Default MIDI CC mappings
Floe sets some default MIDI CC mappings for you. You can turn this off in the preferences. The default mappings are:
- CC 11: Timbre (Master)
- CC 7: Volume (Master)
- CC 1: Macro 1 (Macro)
Sustain Pedal
Floe supports sustain pedal control via MIDI CC-64. When the sustain pedal is pressed, currently held notes will continue playing even after key release, until the pedal is released. This mimics standard piano sustain pedal behaviour.
Pitch Wheel
Floe supports the MIDI pitch wheel. The extend of the pitch bend can be configured individually for each layer by using the pitch bend range parameter on the Play tab of each layer. This per-layer configuration allows for interesting sound design possibilities. A pitch bend range of 0 will disable pitch bend for that layer.
Velocity
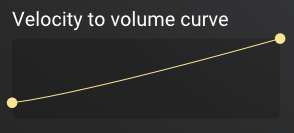
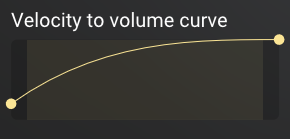
Each layer has a customisable velocity-to-volume curve that maps how hard you play (MIDI velocity) to the layer’s volume. This serves two main purposes: configuring the volume response that works best for your keyboard, and creating creative sound design opportunities when different curves are used across the 3 layers.
Editing velocity curves
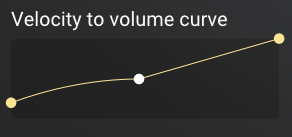
Find the velocity curve editor on the Play tab for each layer. The curve shows velocity input (horizontal) mapped to volume output (vertical).
- Double-click anywhere on the curve to add a control point (up to 6 per layer)
- Drag control points to move them
- Drag between points to adjust curve shape
- Double-click a point to remove it
- Right-click for menu options
Looping
One of the ways that Floe extends into the realm of sample-based synthesis is by offering some powerful looping features.
These looping features adapt to whichever instrument is loaded (the instrument being the sound generator that was loaded into a layer). The GUI makes it clear what the available looping options are.
Most instruments allow you to loop the sound in some way - even when the instrument is a multisampled instrument. However, sample library developers can choose to offer built-in loops, only allow certain modes or disable looping altogether.
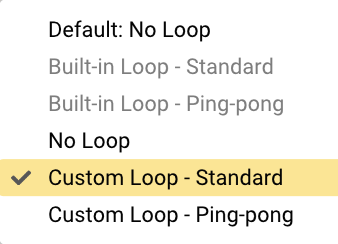
Looping modes
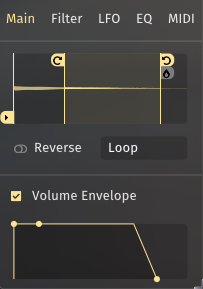
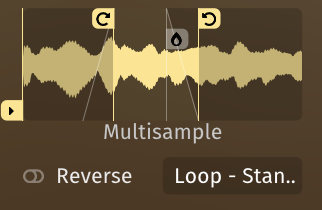
There are 2 loop modes available in Floe: standard wrap-around looping, and ping-pong looping. In the standard mode, the sound will jump back to the start of the loop when it reaches the end. In ping-pong mode, the sound will alternate playing forwards and backwards through the loop.
Crossfades
A crossfade can be applied to smooth the boundary - even in ping-pong mode. It’s normally a good idea to use a crossfade in order to avoid clicks at the loop boundary.
Additional controls
As well as looping, you can control whether the sounds are reversed or have their start position offset.
Parameters
For reference, here is a list of all parameters in Floe.
| Module | Name | ID | Description |
|---|---|---|---|
| Layer 1 | Volume | 160 | Layer volume |
| Layer 1 | Mute | 161 | Mute this layer |
| Layer 1 | Solo | 162 | Mute all other layers |
| Layer 1 | Pan | 163 | Left/right balance |
| Layer 1 | Detune Cents | 164 | Layer pitch in cents; hold shift for finer adjustment |
| Layer 1 | Pitch Semitones | 165 | Layer pitch in semitones |
| Layer 1/Loop | Start | 167 | Loop-start |
| Layer 1/Loop | End | 168 | Loop-end |
| Layer 1/Loop | Crossfade Size | 169 | Crossfade length; this smooths the transition from the loop-end to the loop-start |
| Layer 1/Loop | Sample Start Offset | 171 | Change the starting point of the sample |
| Layer 1/Loop | Reverse On | 172 | Play the sound in reverse |
| Layer 1/Volume Envelope | On | 173 | Enable/disable the volume envelope; when disabled, each sound will play out entirely |
| Layer 1/Volume Envelope | Attack | 174 | Volume fade-in length |
| Layer 1/Volume Envelope | Decay | 175 | Volume ramp-down length (after the attack) |
| Layer 1/Volume Envelope | Sustain | 176 | Volume level to sustain (after decay) |
| Layer 1/Volume Envelope | Release | 177 | Volume fade-out length (after the note is released) |
| Layer 1/Filter | On | 178 | Enable/disable the filter |
| Layer 1/Filter | Cutoff Frequency | 179 | The frequency at which the filter should take effect |
| Layer 1/Filter | Resonance | 180 | The intensity of the volume peak at the cutoff frequency |
| Layer 1/Filter | Type | 181 | Filter type |
| Layer 1/Filter | Envelope Amount | 182 | How strongly the envelope should control the filter cutoff |
| Layer 1/Filter | Attack | 183 | Length of initial ramp-up |
| Layer 1/Filter | Decay | 184 | Length ramp-down after attack |
| Layer 1/Filter | Sustain | 185 | Level to sustain after decay has completed |
| Layer 1/Filter | Release | 186 | Length of ramp-down after note is released |
| Layer 1/LFO | On | 187 | Enable/disable the Low Frequency Oscillator (LFO) |
| Layer 1/LFO | Shape | 188 | Oscillator shape |
| Layer 1/LFO | Mode | 189 | Oscillator phase mode. Retrigger: each voice has its own phase, Free: all voices that are playing simultaneously will have the same phase |
| Layer 1/LFO | Amount | 190 | Intensity of the LFO effect |
| Layer 1/LFO | Target | 191 | The parameter that the LFO will modulate |
| Layer 1/LFO | Time (Tempo Synced) | 192 | LFO rate (synced to the host) |
| Layer 1/LFO | Time (Hz) | 193 | LFO rate (in Hz) |
| Layer 1/LFO | Sync On | 194 | Sync the LFO speed to the host |
| Layer 1/EQ | On | 195 | Turn on or off the equaliser effect for this layer |
| Layer 1/EQ/Band 1 | Frequency | 196 | Band 1: frequency of this band |
| Layer 1/EQ/Band 1 | Resonance | 197 | Band 1: sharpness of the peak |
| Layer 1/EQ/Band 1 | Gain | 198 | Band 1: volume gain at the frequency |
| Layer 1/EQ/Band 1 | Type | 199 | Band 1: type of EQ band |
| Layer 1/EQ/Band 2 | Frequency | 200 | Band 2: frequency of this band |
| Layer 1/EQ/Band 2 | Resonance | 201 | Band 2: sharpness of the peak |
| Layer 1/EQ/Band 2 | Gain | 202 | Band 2: volume gain at the frequency |
| Layer 1/EQ/Band 2 | Type | 203 | Band 2: type of EQ band |
| Layer 1/Playback | Velocity Mapping | 204 | Choose how MIDI velocity should affect the volume of this layer. There are 6 modes that can be selected for this parameter via the buttons on the GUI. By setting one layer to be quiet at high velocities and another layer to be quiet at low velocities you can create an instrument that sounds different based on how hard the notes are played. (0) Ignore velocity, always play full volume. (1) Loudest at high velocity, quietist at low velocity (2) Loudest at low velocity, quietist at high velocity (3) Loudest at high velocity, quietist at middle velocity and below (4) Loudest at middle velocity, quietist at both high and low velocities (5) Loudest at bottom velocity, quietist at middle velocity and above, |
| Layer 1/Playback | Keytrack On | 205 | Tune the sound to match the key played; if disabled it will always play the sound at its root pitch |
| Layer 1/Playback | Monophonic On | 206 | Only allow one voice of each sound to play at a time |
| Layer 1/Playback | MIDI Transpose On | 208 | Transpose the mapping of samples by the given semitone offset, meaning a higher/lower sample may be triggered instead of stretching/shrinking the audio by large amounts (only useful if the instrument is multi-sampled) |
| Layer 1/Loop | Loop Mode | 209 | The mode for looping the samples |
| Layer 1/Playback | Key Range Low | 210 | The lowest key that will trigger this layer; if the key is lower than this, the layer will not play |
| Layer 1/Playback | Key Range High | 211 | The highest key that will trigger this layer; if the key is higher than this, the layer will not play |
| Layer 1/Playback | Key Range Low Fade | 212 | The length of the volume fade-in at the low end of the key range |
| Layer 1/Playback | Key Range High Fade | 213 | The length of the volume fade-out at the high end of the key range |
| Layer 1/Playback | Pitch Bend Range | 214 | The pitch range in semitones of the MIDI pitch wheel |
| Layer 2 | Volume | 320 | Layer volume |
| Layer 2 | Mute | 321 | Mute this layer |
| Layer 2 | Solo | 322 | Mute all other layers |
| Layer 2 | Pan | 323 | Left/right balance |
| Layer 2 | Detune Cents | 324 | Layer pitch in cents; hold shift for finer adjustment |
| Layer 2 | Pitch Semitones | 325 | Layer pitch in semitones |
| Layer 2/Loop | Start | 327 | Loop-start |
| Layer 2/Loop | End | 328 | Loop-end |
| Layer 2/Loop | Crossfade Size | 329 | Crossfade length; this smooths the transition from the loop-end to the loop-start |
| Layer 2/Loop | Sample Start Offset | 331 | Change the starting point of the sample |
| Layer 2/Loop | Reverse On | 332 | Play the sound in reverse |
| Layer 2/Volume Envelope | On | 333 | Enable/disable the volume envelope; when disabled, each sound will play out entirely |
| Layer 2/Volume Envelope | Attack | 334 | Volume fade-in length |
| Layer 2/Volume Envelope | Decay | 335 | Volume ramp-down length (after the attack) |
| Layer 2/Volume Envelope | Sustain | 336 | Volume level to sustain (after decay) |
| Layer 2/Volume Envelope | Release | 337 | Volume fade-out length (after the note is released) |
| Layer 2/Filter | On | 338 | Enable/disable the filter |
| Layer 2/Filter | Cutoff Frequency | 339 | The frequency at which the filter should take effect |
| Layer 2/Filter | Resonance | 340 | The intensity of the volume peak at the cutoff frequency |
| Layer 2/Filter | Type | 341 | Filter type |
| Layer 2/Filter | Envelope Amount | 342 | How strongly the envelope should control the filter cutoff |
| Layer 2/Filter | Attack | 343 | Length of initial ramp-up |
| Layer 2/Filter | Decay | 344 | Length ramp-down after attack |
| Layer 2/Filter | Sustain | 345 | Level to sustain after decay has completed |
| Layer 2/Filter | Release | 346 | Length of ramp-down after note is released |
| Layer 2/LFO | On | 347 | Enable/disable the Low Frequency Oscillator (LFO) |
| Layer 2/LFO | Shape | 348 | Oscillator shape |
| Layer 2/LFO | Mode | 349 | Oscillator phase mode. Retrigger: each voice has its own phase, Free: all voices that are playing simultaneously will have the same phase |
| Layer 2/LFO | Amount | 350 | Intensity of the LFO effect |
| Layer 2/LFO | Target | 351 | The parameter that the LFO will modulate |
| Layer 2/LFO | Time (Tempo Synced) | 352 | LFO rate (synced to the host) |
| Layer 2/LFO | Time (Hz) | 353 | LFO rate (in Hz) |
| Layer 2/LFO | Sync On | 354 | Sync the LFO speed to the host |
| Layer 2/EQ | On | 355 | Turn on or off the equaliser effect for this layer |
| Layer 2/EQ/Band 1 | Frequency | 356 | Band 1: frequency of this band |
| Layer 2/EQ/Band 1 | Resonance | 357 | Band 1: sharpness of the peak |
| Layer 2/EQ/Band 1 | Gain | 358 | Band 1: volume gain at the frequency |
| Layer 2/EQ/Band 1 | Type | 359 | Band 1: type of EQ band |
| Layer 2/EQ/Band 2 | Frequency | 360 | Band 2: frequency of this band |
| Layer 2/EQ/Band 2 | Resonance | 361 | Band 2: sharpness of the peak |
| Layer 2/EQ/Band 2 | Gain | 362 | Band 2: volume gain at the frequency |
| Layer 2/EQ/Band 2 | Type | 363 | Band 2: type of EQ band |
| Layer 2/Playback | Velocity Mapping | 364 | Choose how MIDI velocity should affect the volume of this layer. There are 6 modes that can be selected for this parameter via the buttons on the GUI. By setting one layer to be quiet at high velocities and another layer to be quiet at low velocities you can create an instrument that sounds different based on how hard the notes are played. (0) Ignore velocity, always play full volume. (1) Loudest at high velocity, quietist at low velocity (2) Loudest at low velocity, quietist at high velocity (3) Loudest at high velocity, quietist at middle velocity and below (4) Loudest at middle velocity, quietist at both high and low velocities (5) Loudest at bottom velocity, quietist at middle velocity and above, |
| Layer 2/Playback | Keytrack On | 365 | Tune the sound to match the key played; if disabled it will always play the sound at its root pitch |
| Layer 2/Playback | Monophonic On | 366 | Only allow one voice of each sound to play at a time |
| Layer 2/Playback | MIDI Transpose On | 368 | Transpose the mapping of samples by the given semitone offset, meaning a higher/lower sample may be triggered instead of stretching/shrinking the audio by large amounts (only useful if the instrument is multi-sampled) |
| Layer 2/Loop | Loop Mode | 369 | The mode for looping the samples |
| Layer 2/Playback | Key Range Low | 370 | The lowest key that will trigger this layer; if the key is lower than this, the layer will not play |
| Layer 2/Playback | Key Range High | 371 | The highest key that will trigger this layer; if the key is higher than this, the layer will not play |
| Layer 2/Playback | Key Range Low Fade | 372 | The length of the volume fade-in at the low end of the key range |
| Layer 2/Playback | Key Range High Fade | 373 | The length of the volume fade-out at the high end of the key range |
| Layer 2/Playback | Pitch Bend Range | 374 | The pitch range in semitones of the MIDI pitch wheel |
| Layer 3 | Volume | 480 | Layer volume |
| Layer 3 | Mute | 481 | Mute this layer |
| Layer 3 | Solo | 482 | Mute all other layers |
| Layer 3 | Pan | 483 | Left/right balance |
| Layer 3 | Detune Cents | 484 | Layer pitch in cents; hold shift for finer adjustment |
| Layer 3 | Pitch Semitones | 485 | Layer pitch in semitones |
| Layer 3/Loop | Start | 487 | Loop-start |
| Layer 3/Loop | End | 488 | Loop-end |
| Layer 3/Loop | Crossfade Size | 489 | Crossfade length; this smooths the transition from the loop-end to the loop-start |
| Layer 3/Loop | Sample Start Offset | 491 | Change the starting point of the sample |
| Layer 3/Loop | Reverse On | 492 | Play the sound in reverse |
| Layer 3/Volume Envelope | On | 493 | Enable/disable the volume envelope; when disabled, each sound will play out entirely |
| Layer 3/Volume Envelope | Attack | 494 | Volume fade-in length |
| Layer 3/Volume Envelope | Decay | 495 | Volume ramp-down length (after the attack) |
| Layer 3/Volume Envelope | Sustain | 496 | Volume level to sustain (after decay) |
| Layer 3/Volume Envelope | Release | 497 | Volume fade-out length (after the note is released) |
| Layer 3/Filter | On | 498 | Enable/disable the filter |
| Layer 3/Filter | Cutoff Frequency | 499 | The frequency at which the filter should take effect |
| Layer 3/Filter | Resonance | 500 | The intensity of the volume peak at the cutoff frequency |
| Layer 3/Filter | Type | 501 | Filter type |
| Layer 3/Filter | Envelope Amount | 502 | How strongly the envelope should control the filter cutoff |
| Layer 3/Filter | Attack | 503 | Length of initial ramp-up |
| Layer 3/Filter | Decay | 504 | Length ramp-down after attack |
| Layer 3/Filter | Sustain | 505 | Level to sustain after decay has completed |
| Layer 3/Filter | Release | 506 | Length of ramp-down after note is released |
| Layer 3/LFO | On | 507 | Enable/disable the Low Frequency Oscillator (LFO) |
| Layer 3/LFO | Shape | 508 | Oscillator shape |
| Layer 3/LFO | Mode | 509 | Oscillator phase mode. Retrigger: each voice has its own phase, Free: all voices that are playing simultaneously will have the same phase |
| Layer 3/LFO | Amount | 510 | Intensity of the LFO effect |
| Layer 3/LFO | Target | 511 | The parameter that the LFO will modulate |
| Layer 3/LFO | Time (Tempo Synced) | 512 | LFO rate (synced to the host) |
| Layer 3/LFO | Time (Hz) | 513 | LFO rate (in Hz) |
| Layer 3/LFO | Sync On | 514 | Sync the LFO speed to the host |
| Layer 3/EQ | On | 515 | Turn on or off the equaliser effect for this layer |
| Layer 3/EQ/Band 1 | Frequency | 516 | Band 1: frequency of this band |
| Layer 3/EQ/Band 1 | Resonance | 517 | Band 1: sharpness of the peak |
| Layer 3/EQ/Band 1 | Gain | 518 | Band 1: volume gain at the frequency |
| Layer 3/EQ/Band 1 | Type | 519 | Band 1: type of EQ band |
| Layer 3/EQ/Band 2 | Frequency | 520 | Band 2: frequency of this band |
| Layer 3/EQ/Band 2 | Resonance | 521 | Band 2: sharpness of the peak |
| Layer 3/EQ/Band 2 | Gain | 522 | Band 2: volume gain at the frequency |
| Layer 3/EQ/Band 2 | Type | 523 | Band 2: type of EQ band |
| Layer 3/Playback | Velocity Mapping | 524 | Choose how MIDI velocity should affect the volume of this layer. There are 6 modes that can be selected for this parameter via the buttons on the GUI. By setting one layer to be quiet at high velocities and another layer to be quiet at low velocities you can create an instrument that sounds different based on how hard the notes are played. (0) Ignore velocity, always play full volume. (1) Loudest at high velocity, quietist at low velocity (2) Loudest at low velocity, quietist at high velocity (3) Loudest at high velocity, quietist at middle velocity and below (4) Loudest at middle velocity, quietist at both high and low velocities (5) Loudest at bottom velocity, quietist at middle velocity and above, |
| Layer 3/Playback | Keytrack On | 525 | Tune the sound to match the key played; if disabled it will always play the sound at its root pitch |
| Layer 3/Playback | Monophonic On | 526 | Only allow one voice of each sound to play at a time |
| Layer 3/Playback | MIDI Transpose On | 528 | Transpose the mapping of samples by the given semitone offset, meaning a higher/lower sample may be triggered instead of stretching/shrinking the audio by large amounts (only useful if the instrument is multi-sampled) |
| Layer 3/Loop | Loop Mode | 529 | The mode for looping the samples |
| Layer 3/Playback | Key Range Low | 530 | The lowest key that will trigger this layer; if the key is lower than this, the layer will not play |
| Layer 3/Playback | Key Range High | 531 | The highest key that will trigger this layer; if the key is higher than this, the layer will not play |
| Layer 3/Playback | Key Range Low Fade | 532 | The length of the volume fade-in at the low end of the key range |
| Layer 3/Playback | Key Range High Fade | 533 | The length of the volume fade-out at the high end of the key range |
| Layer 3/Playback | Pitch Bend Range | 534 | The pitch range in semitones of the MIDI pitch wheel |
| Effect/Distortion | Type | 3 | Distortion algorithm type |
| Effect/Distortion | Drive | 4 | Distortion amount |
| Effect/Distortion | On | 5 | Enable/disable the distortion effect |
| Effect/Bitcrush | Bits | 6 | Audio resolution |
| Effect/Bitcrush | Sample Rate | 7 | Sample rate |
| Effect/Bitcrush | Wet | 8 | Processed signal volume |
| Effect/Bitcrush | Dry | 9 | Unprocessed signal volume |
| Effect/Bitcrush | On | 10 | Enable/disable the bitcrush effect |
| Effect/Compressor | Threshold | 11 | The threshold that the audio has to pass above before the compression should start taking place |
| Effect/Compressor | Ratio | 12 | The intensity of compression (high ratios mean more compression) |
| Effect/Compressor | Gain | 13 | Additional control for volume after compression |
| Effect/Compressor | Auto Gain | 14 | Automatically re-adjust the gain to stay consistent regardless of compression intensity |
| Effect/Compressor | On | 15 | Enable/disable the compression effect |
| Effect/Filter | On | 16 | Enable/disable the filter |
| Effect/Filter | Cutoff Frequency | 17 | Frequency of filter effect |
| Effect/Filter | Resonance | 18 | The intensity of the volume peak at the cutoff frequency |
| Effect/Filter | Gain | 19 | Volume gain of shelf filter |
| Effect/Filter | Type | 20 | Filter type |
| Effect/StereoWiden | Width | 21 | Increase or decrease the stereo width |
| Effect/StereoWiden | On | 22 | Turn the stereo widen effect on or off |
| Effect/Chorus | Rate | 23 | Chorus modulation rate |
| Effect/Chorus | High-pass | 24 | High-pass filter cutoff |
| Effect/Chorus | Depth | 25 | Chorus effect intensity |
| Effect/Chorus | Wet | 26 | Processed signal volume |
| Effect/Chorus | Dry | 27 | Unprocessed signal volume |
| Effect/Chorus | On | 28 | Enable/disable the chorus effect |
| Effect/Convolution Reverb | High-pass | 65 | Wet high-pass filter cutoff |
| Effect/Convolution Reverb | Wet | 66 | Processed signal volume |
| Effect/Convolution Reverb | Dry | 67 | Unprocessed signal volume |
| Effect/Convolution Reverb | On | 68 | Enable/disable the convolution reverb effect |
| Effect/Reverb | Decay Time | 69 | Reverb decay time |
| Effect/Reverb | Pre Low Cutoff | 70 | Low-pass filter cutoff before reverb |
| Effect/Reverb | Pre High Cutoff | 71 | High-pass filter cutoff before reverb |
| Effect/Reverb | Low Cutoff | 72 | Low-pass filter cutoff after reverb |
| Effect/Reverb | Low Gain | 73 | Low-pass filter gain |
| Effect/Reverb | High Cutoff | 74 | High-pass filter cutoff after reverb |
| Effect/Reverb | High Gain | 75 | High-pass filter gain |
| Effect/Reverb | Chorus Amount | 76 | Chorus effect amount |
| Effect/Reverb | Chorus Frequency | 77 | Chorus effect frequency |
| Effect/Reverb | Size | 78 | Reverb size |
| Effect/Reverb | Delay | 79 | Reverb delay |
| Effect/Reverb | Mix | 80 | Processed signal volume |
| Effect/Reverb | On | 81 | Enable/disable the new reverb effect |
| Effect/Phaser | Feedback | 82 | Feedback amount |
| Effect/Phaser | Mod Rate | 83 | Speed at which the phaser filters modulate |
| Effect/Phaser | Center Frequency | 84 | Center frequency of the phaser filters |
| Effect/Phaser | Shape | 85 | Shape of the phaser filter’s peaks |
| Effect/Phaser | Mod Depth | 86 | The range over which the phaser filters modulate |
| Effect/Phaser | Stereo Amount | 87 | Adds a stereo effect by offsetting the left and right filters |
| Effect/Phaser | Mix | 88 | Mix between the wet and dry signals |
| Effect/Phaser | On | 89 | Enable/disable the phaser effect |
| Effect/Delay | Mode | 90 | Delay type |
| Effect/Delay | Filter Cutoff | 91 | High/low frequency reduction |
| Effect/Delay | Filter Spread | 92 | Width of the filter |
| Effect/Delay | Time Left (ms) | 93 | Left delay time (in milliseconds) |
| Effect/Delay | Legacy Time Right (ms) | 94 | Right delay time (in milliseconds) |
| Effect/Delay | Time Left (Tempo Synced) | 95 | Left delay time (synced to the host tempo) |
| Effect/Delay | Time Right (Tempo Synced) | 96 | Right delay time (synced to the host tempo) |
| Effect/Delay | On | 97 | Synchronise timings to the host’s BPM |
| Effect/Delay | Mix | 98 | Level of processed signal |
| Effect/Delay | On | 99 | Enable/disable the delay effect |
| Effect/Delay | Feedback | 100 | How much the signal repeats |
| Master | Volume | 0 | Master volume |
| Master | Velocity To Volume Strength | 1 | The amount that the MIDI velocity affects the volume of notes; 100% means notes will be silent when the velocity is very soft, and 0% means that notes will play full volume regardless of the velocity |
| Master | Timbre | 2 | The intstruments timbre. Not every instrument contains timbre information; instruments that do will be highlighted when you click on this knob. |
| Macro | Macro 1 | 101 | A macro that can be assigned to any parameter in the instrument. The macro will affect all parameters that are assigned to it. |
| Macro | Macro 2 | 102 | A macro that can be assigned to any parameter in the instrument. The macro will affect all parameters that are assigned to it. |
| Macro | Macro 3 | 103 | A macro that can be assigned to any parameter in the instrument. The macro will affect all parameters that are assigned to it. |
| Macro | Macro 4 | 104 | A macro that can be assigned to any parameter in the instrument. The macro will affect all parameters that are assigned to it. |
Macros
At a glance
- Control multiple parameters at once with a single knob.
- 4 macros available, each controlling up to 6 parameters.
- Perfect for expressive performance and creating custom controls.
- Found in the bottom panel: Play tab for performance, Macros tab for editing.
What are macros?
Macros are powerful controls that let you move multiple parameters simultaneously with a single knob turn. Think of them as custom controls that you design to fit your musical needs. Instead of tweaking multiple knobs separately, you can create a macro that adjusts filter cutoff, reverb amount, and delay feedback all at once — perfect for dramatic breakdowns or smooth transitions.
Floe provides 4 macros, and each macro can control up to 6 different parameters. This gives you tremendous flexibility to create expressive, performance-ready controls that transform your sounds in musical ways.
Setting up macros
Complete workflow: creating macro destinations, adjusting amounts, and renaming
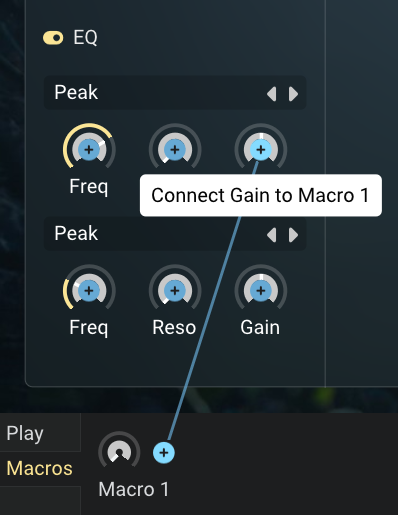
Creating a macro destination
- Navigate to the Macros tab in the bottom panel
- Hover your mouse over any macro knob — a plus icon will appear
- Click the plus icon to enter destination selection mode
- All automatable parameters in Floe will now show plus icons
- Click on any highlighted parameter to link it to your macro
Adjusting macro strength
Once you’ve linked a parameter to a macro, a small knob appears next to the macro. This destination amount knob controls how much the macro affects that parameter.
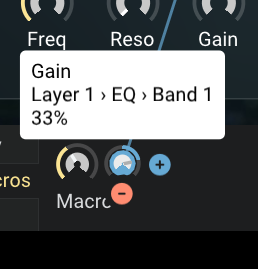
- Positive values: Parameter increases when macro is turned up
- Negative values: Parameter decreases when macro is turned up (bi-directional control)
- Strength: Higher percentages create more dramatic changes
The macro’s effect is relative to the parameter’s current position, so you can set your base sound first, then use macros to perform variations around that starting point.
Managing macros
Removing destinations
To unlink a parameter from a macro:
- Hover over the destination amount knob
- A minus icon will appear below the knob
- Click the minus icon to remove the connection
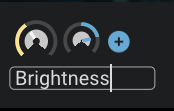
Renaming macros
Give your macros meaningful names:
- Go to the Macros tab
- Click on the macro’s name
- Type your new name
Using macros for performance
Switch to the Play tab for quick access to your macros during performance. This keeps your most expressive controls front and center while you’re making music.
For preset creators
If you’re creating presets for others, macros are essential for making your sounds performance-ready. Well-designed macros turn static presets into dynamic, expressive instruments. Consider what aspects of the sound would be most musical to control, and create macros that enhance the emotional impact of the preset rather than just providing technical adjustments.
Autosave
Floe reduces the chance of you losing your work by automatically saving its state frequently.
Autosaves are useful if either Floe or the DAW crashes unexpectedly — hopefully a very rare occurrence. But they’re also useful for other reasons such as accidentally removing a track, or changing parameters in a way you didn’t intend.
Every instance of Floe has an auto-generated name, for example: dawn-205. You can see this in the top panel of Floe’s window. This is useful because it helps identify which instance of Floe an autosave came from so that you can correctly restore it. Autosave files also contain the date and time they were created.
The autosave feature has reasonable default settings, but you can edit them in the Preferences panel too.
Autosaves are just preset files. You can load them as you would a preset file. Autosaves can be found here:
- Windows:
C:\Users\Public\Floe\Autosaves - macOS:
/Users/Shared/Floe/Autosaves - Linux:
~/Floe/Autosaves
Some additional things to note:
- The autosave system is efficient - it shouldn’t noticeably slow your computer down.
- Floe will automatically delete autosaves older than a given number of days.
- Floe will only keep a certain number of autosaves per instance. If the limit is reached, the oldest autosave will be deleted to make room for the new one.
- Autosaves are tiny files, typically around 2 Kb in size. Your computer won’t run out of space because of them.
In the future we’d like to add a friendly interface for browsing and restoring autosaves.
Attribution
At a glance
If a sample library requires attribution:
- Floe will show you the required attribution text.
- Copy-and-paste this text alongside wherever you share your music.
- You own your music (sell it, relicense it, etc.) - you just need to credit the creator of the sounds.
The above bullet points assume the license is the “Creative Commons Attribution 4.0 International” license — a very common attribution-required license.
About attribution-required licenses
A license tells you what you can and can’t do with a sample library. Most developers choose a license that allows you to use the sounds in your music without having to credit them.
However, some developers choose an attribution-required license such as the widely-used Creative Commons Attribution license (also known as “CC BY”).
This license allows you to use the sounds for free, even in commercial projects, as long as you credit the creator by including a bit of attribution text along with your music. For example, you might include the text in a caption on your website, in the album notes or in a credits roll (or any “reasonable manner”). The music that you create with sounds under this license is yours: you can sell it, stream it, relicense it or give it away; you are just required to credit the sound’s creator.
For some people, giving attribution is a deal-breaker. But here’s some reasons why it might not be so bad:
- Attributions can support the creators of sounds - providing them with recognition, traffic, and potential customers.
- Sharing where your sounds come from helps other musicians find great sounds too - increasing the quality of music everywhere.
- Attributions can look professional and show a high level of care in your work.
How Floe helps
Floe makes it dead-easy to comply with attribution requirements. When you load a sound from a library that requires attribution, Floe will show a small icon in the top of the window. Clicking this will show you the exact text that you can copy-and-paste wherever you need to. Floe tracks all attribution requirements across all instances of Floe, so you only need to do it once.
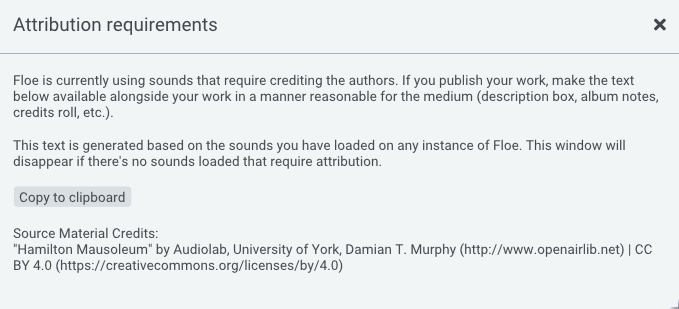
Example of the attribution GUI in Floe
Disclaimer
Whilst this page is based on careful research and understanding of the topic, it is not legal advice.
Error Reporting
Floe strives to be reliable for professional work. To help us achieve this we have various systems in place.
Error reports
If Floe detects that something has gone wrong, it will submit a totally anonymous error report to us. This report contains information about the error, the state of Floe leading up to the error, and information about the computer Floe is running on.
This enables us to get the key information to fix bugs quickly without having to get you to manually gather and send us information.
You can disable all online reporting in the Preferences panel if you wish. Floe is open source, so you can also inspect the code to see how this works.
Send feedback
Floe has a form that you can use to submit bug reports, feature requests, or general feedback. This is found by clicking on the ‘Send Feedback’ button in the three-dots menu at the top of Floe’s window.
Please use this to report any issues you encounter. We want to know about it and want to fix it.
Crash protection
Floe tries to never crash the host. If Floe detects that something has gone wrong, it will enter an unresponsive mode rather than crashing the host. It won’t produce any sound and it can’t be interacted with.
In this rare situation, make note of the instance name at the top of Floe’s window, such as ‘dawn-205’. Then, remove the plugin from your DAW and re-add it. You can then restore your work from an autosave with the instance name you just noted. Anonymous crash information will usually be reported to us automatically for us to address the issue.
Developing Libraries for Floe
This page explains how to develop sample libraries for Floe.
Creating sample libraries for Floe requires programming knowledge. While Floe itself is designed for all musicians, developing libraries involves writing Lua scripts to configure and map audio files. This programming-first approach enables workflows and features that are rare to achieve with traditional GUI-based tools.
In the future, we’re looking at tools that convert/generate Floe Lua scripts to allow non-programmers to create libraries.
What you’ll need
- Basic programming concepts (variables, functions, loops) or willingness to learn
- Familiarity with text editors (Sublime Text, VS Code, etc.)
- Understanding of sample mapping concepts (key ranges, velocity layers)
Floe’s sample library format
Floe’s format is designed for configuring audio files into playable instruments. It does not add any audio-manipulation or custom GUIs. Floe has a ready-to-use GUI and lots of audio parameters. In the future we might add more advanced scripting/GUI creation features to the format. The format is designed to be extended whilst retaining backwards compatibility.
Floe’s sample library format currently supports the following features:
- Velocity layers
- Round-robin
- Crossfade layers
- Loop points with crossfade
- Convolution reverb IRs
- Velocity layer feathering
- Trigger samples on note-off
As someone in the community put it, our format is essentially ‘SFZ in Lua so you don’t lose your mind’ - which captures the gist pretty well.
Why a new format?
No existing format met our requirements for Floe, which are:
- Libraries should be plain folders of audio files.
- Libraries should be portable across filesystems & operating systems.
- Libraries should be configured using a proper programming language to enable creating complex libraries in a maintainable way.
- The format should be extensible - allowing us to innovate in the field of sampling.
- The solution should easily integrate into Floe’s codebase.
We’re not trying to replace existing formats or create a new standard. Instead, our custom format is specifically designed to align with Floe’s architecture and philosophy, enabling us to rapidly develop and deliver the high-quality sample libraries our users deserve.
Developer friendly
Floe’s format is designed to be developer-friendly. It plays well into the tooling and experience of people who are used to dealing with code:
- Works with version control: libraries are just folders of files, they’re portable across filesystems and operating systems.
- Hot reloading: Floe automatically reloads the library whenever you change a file: Lua, audio, or images. It creates a very fast feedback loop.
- Uses a full programming language: Lua is simple, powerful, and widely used. You can use variables, functions, loops, and conditionals to configure your library.
- Floe’s Lua API is simple and concise.
The structure
Let’s look at the structure of a Floe sample library:
📂FrozenPlain - Slow/
├── 📄slow.floe.lua
├── 📄Licence.pdf
├── 📄About Slow.html
├── 📁Samples/
│   ├── 📄synth_sustain_c4.flac
│   └── 📄synth_sustain_d4.flac
└── 📁Images/
    ├── 📄background.png
    └── 📄icon.png
There’s only one essential part of a Floe sample library: the floe.lua file. This file can have a custom name so long as it ends with .floe.lua - for example, woodwind-textures.floe.lua.
The rest of the structure are conventions that are recommended but not required:
- Licence: Sample libraries are recommended to have a file called Licence that describes the terms-of-use of the library. It can be any format: PDF, TXT, etc.
- About: A file that describes the library. Any file format. Information about a library is useful for when someone might not have Floe’s GUI available. Use this document to explain what the library contains, website links and any other information that might be useful. Floe’s packager tool can automatically generate this file.
- Library folder name: The folder containing the
floe.luafile should be named: “Developer - Library Name”. - Subfolders: Subfolders are up to the developer. We recommend ‘Samples’ for audio files and ‘Images’ for images. These can have any number of subfolders. Your
floe.luafile can reference any file in these subfolders.
The floe.lua file
The floe.lua file is the most important part of a library. It’s a script that maps and configures the audio files into playable instruments, written in the Lua 5.4 programming language.
This file uses Floe’s Lua functions to create the library, create instruments, and add regions and impulse responses. It can reference any file in the library using relative paths.
Here’s a made-up example of a floe.lua file:
local library = floe.new_library({
    name = "Iron Vibrations",
    tagline = "Organic sounds from resonating metal objects",
    library_url = "https://example.com/iron-vibrations",
    description = "A collection of resonating metal objects sampled using a handheld stereo recorder.",
    author = "Found-sound Labs",
    author_url = "https://example.com",
    minor_version = 1,
    background_image_path = "Images/background.jpg",
    icon_image_path = "Images/icon.png",
})

local instrument = floe.new_instrument(library, {
    name = "Metal Fence Strike",
    folder = "Fences/Steel",
    description = "Tonal pluck metallic pluck made from striking a steel fence.",
    tags = { "found sounds", "tonal percussion", "metal", "keys", "cold", "ambient", "IDM", "cinematic" },
    waveform_audio_path = "Samples/file1.flac",
})

floe.add_region(instrument, {
    path = "Samples/One-shots/Resonating String.flac",
    root_key = 60,
    trigger_criteria = {
        trigger_event = "note-on",
        key_range = { 60, 64 },
        velocity_range = { 0, 100 },
        velocity_range_high_resolution = { 0, 1000 },
        round_robin_index = 0,
        round_robin_sequencing_group = "group1",
        feather_overlapping_velocity_layers = false,
        auto_map_key_range_group = "group1",
    },
    loop = {
        builtin_loop = {
            start_frame = 24,
            end_frame = 6600,
            crossfade = 100,
            mode = "standard",
            lock_loop_points = false,
            lock_mode = false,
        },
        loop_requirement = "always-loop",
    },
    timbre_layering = {
        layer_range = { 0, 50 },
    },
    audio_properties = {
        gain_db = -3,
        start_offset_frames = 0,
        tune_cents = 0,
        fade_in_frames = 0,
    },
    playback = {
        keytrack_requirement = "default",
    },
})

floe.add_ir(library, {
    name = "Cathedral",
    path = "irs/cathedral.flac",
    folder = "Cathedrals",
    tags = { "acoustic", "cathedral" },
    description = "Sine sweep in St. Paul's Cathedral.",
    audio_properties = {
        gain_db = -3,
    },
})

floe.set_attribution_requirement("Samples/bell.flac", {
    title = "Bell Strike",
    license_name = "CC-BY-4.0",
    license_url = "https://creativecommons.org/licenses/by/4.0/",
    attributed_to = "John Doe",
    attribution_url = "https://example.com",
})

floe.add_named_key_range(instrument, {
    name = "Extended Notes",
    key_range = { 80, 128 },
})

floe.set_required_floe_version("1.0.6+1aa1a41a")

local extended_table = floe.extend_table({ foo = "" }, {})

local hundred_range = floe.midi_range_to_hundred_range({ 0, 127 })

local thousand_range = floe.midi_range_to_thousand_range({ 0, 127 })

return library
floe.new_library() must be called and returned it at the end of the script. All other features are optional. When Floe runs your Lua file, it will show you any errors that occur along with a line number and a description.
How to get started
- Create a new folder in one of Floe’s sample library folders. We recommend naming it ‘Author Name - Library Name’.
- Create a file in that folder called
my-library.floe.lua. - Create a subfolder called
Samplesand put your audio files in there. - Open the Lua file in your text editor. If you’re not already familiar with an editor, then Sublime Text or Visual Studio Code are reasonable choices.
- Use the
floe.new_library()function to create your library, filling in all the fields marked[required]in the Floe’s Lua reference. - Use
floe.new_instrument()to create an instrument, and then add regions to it usingfloe.add_region(), again, filling in the fields that are documented. - At the end of the file, return the library object you just created:
return library. - Floe automatically detects whenever any library file changes and will tell you if there’s any errors. If a library is correctly configured, it will instantly appear in Floe.
Approach to sample mapping
You can start by manually writing individual add_region calls for each sample, filling out the required information as you go. When things start getting repetitive or you need to apply consistent logic across many samples, you’ll want to leverage Lua’s programming features:
- Signet to analyse your samples and generate metadata files
- Variables and tables to store information about your samples
- Loops to process multiple samples with the same logic
- Functions to calculate parameters like tuning, velocity ranges, and key ranges
- Pattern matching to extract information from filenames
This programming approach can make it much more practical to work with larger sample sets - you write the mapping logic once and let the code apply it to all your samples.
Using Signet
The command line tool Signet in an excellent aid for developing Floe samples libraries. Signet can export data about your samples in Lua format which you can then use in your floe.lua file using dofile.
For example, this file is generated by Signet:
-- signet . print-info --format lua --path-as-key
-- NOTE: Signet can also detect the pitch of your samples when
-- you use the `--detect-pitch` flag with print-info.
return {
  ["my-sample-a.flac"] = {
    bit_depth = 16,
    channels = 2,
    crest_factor = 16.5734,
    crest_factor_db = 24.3883,
    frames = 208341,
    length_seconds = 4.34044,
    metadata = nil,
    peak_db = -3.00036,
    peak_frame = 5927,
    rms_db = -27.3886,
    sample_rate = 48000
  },
  ["my-sample-b.flac"] = {
    bit_depth = 24,
    channels = 2,
    crest_factor = 8.90268,
    crest_factor_db = 18.9904,
    frames = 2299122,
    length_seconds = 47.8984,
    metadata = nil,
    peak_db = -3,
    peak_frame = 877676,
    rms_db = -21.9904,
    sample_rate = 48000
  },
}
Then in your Floe Lua file you have access to all the information about your samples allowing you to easily create instruments and regions.
With the features of a full programming language and Floe’s hot-reloading of scripts, it’s easy to create complex configurations and bulk-tweak tuning, normalisation, loop points, and other parameters of an instrument.
For example, normalising all samples to a target level can be done using a simple calculation based on the sample’s peak_db value. We often find it’s useful to partially move levels towards a target level rather than fully normalising them in order to retain some of the character of the instrument. This can be computed in the Lua and tweaked as needed, with the results being immediately audible in Floe.
Floe doesn’t generate this kind of audio data for you because it can be slow to scan large folders of samples. It’s better for the sample library developer to generate it once with Signet and bake it into a Lua file, instead of the sample library users having to wait every time they load the library.
Creating high-quality samples
Levels
It’s important to ensure your audio samples have the the right levels. This makes browsing and switching samples in Floe a consistent, nice experience. Additionally, Floe offers the ability to layer sounds together; this process is more ergonomic when instruments have similar volume levels.
Signet can be a useful tool for changing the levels of your samples.
When changing the volume levels of a realistic multi-sampled instrument, you probably don’t want to normalise each sample individually because part of the character of the instrument is its volume variation. Instead, you should change the gain of the instrument as a whole. Signet has features for this. It also has features for proportionally moving levels towards a target level. This allows you to keep some of the character of an instrument while nudging it towards a more consistent level.
Here are some guidelines for levels:
- Each sample’s peak level should be less than -3 dB.
- Playing the instrument should barely cause Floe’s peak meter to reach its yellow region. Another way to levels could be this: RMS levels for an instrument as a whole should be around -18 dB. Play the instrument polyphonically and watch the RMS level. If the instrument is designed to be monophonic, then adjust for that.
- The noise floor should be as low as possible: -60 dB is a good target. Use high-quality noise reduction tools to remove noise from your samples if you need to. Noise levels can quickly stack up with a multi-sampled instrument played polyphonically. Being too aggressive with algorithmic noise reduction can make your samples sound unnatural - so it’s a balance.
- Impulse responses should be normalised by their energy (power) levels:
signet my-impulses norm -100 --mode energy --independently && signet my-impulses norm 0. Or if not using Signet, then adjust their levels so that they feel similar to the volume levels of Floe’s built-in IRs.
Sample rate, bit depth, and file format
Floe only supports FLAC and WAV files. We recommend using FLAC for your samples. It’s lossless and can reduce the file size by 50% to 70% compared to WAV. Floe loads FLAC files very quickly.
We find 44.1 kHz and 16-bit is often a perfectly reasonable choice. 48 kHz and 24-bit might also be appropriate in certain cases. FLAC also supports bit-depths between 16 and 24 bits (such as 20-bit). Floe supports these too.
Volume envelopes of samples
Floe blurs the line between a sampler and a sample-based synthesizer. It has lots of parameters for manipulating the sound in real-time.
If your sample is a single continuous sound, then don’t include a fade-in or fade-out in the sample. Floe has a GUI for volume envelopes that offer more control: they can be adjusted to any value, automated by the DAW, and they are independent of the playback speed of the sample. If you have a sample that is stretched across a keyboard range, it will be sped-up or slowed-down in order to be the correct pitch. If there’s a volume fade, then the speed of the fade will change depending on the pitch of the voice. This is not normally a desirable effect.
If your sound has important timbral variation over time, then don’t cut that away. Only if the sound is a constant tone should you remove the fade in/out.
Library Lua Scripts
The floe.lua file is the most important part of a Floe sample library. This page serves as documentation for all the functions that you can use in your script to create and configure the library and its instruments.
Floe runs your script using Lua v5.4, providing you with access to these standard libraries: math, string, table and utf8. The other standard libraries are not available - including the require function. This is to minimise security risks.
If there are any errors in your script, Floe will show them on the GUI along with a line number and a description of the problem.
Multiple files
dofile() is available, so you can split your script into multiple files if you want to. Floe’s dofile implementation is the same as the standard Lua version except that you can only specify files relative to the library folder — that is, the folder that contains the floe.lua file.
For example, you could have a folder next to floe.lua called Lua and put a file in there called data.lua. You could then load that file with dofile("Lua/data.lua").
To pass data between files, you would typically use the “module” pattern (except using dofile instead of require).
Library Functions
Use these functions to create your sample library. Take note of the [required] annotations - omitting fields marked with these will cause an error.
floe.new_library
Creates a new library. It takes one parameter: a table of configuration. It returns a new library object. You should only create one library in your script. Return the library at the end of your script.
The library is the top-level object. It contains all the instruments, regions, and impulse responses.
-- Creates a new library. You should only create one library in your script.
-- Return the library at the end of your script.
local library = floe.new_library({
    -- The name of the library. Keep it short and use tagline for more details.
    -- [required]
    name = "Iron Vibrations",

    -- A few words to describe the library. [required]
    tagline = "Organic sounds from resonating metal objects",

    -- The URL for this Floe library.
    -- [optional, default: no url]
    library_url = "https://example.com/iron-vibrations",

    -- A description of the library. You can be verbose and use newlines (\n).
    -- [optional, default: no description]
    description = "A collection of resonating metal objects sampled using a handheld stereo recorder.",

    -- Who created this library. Keep it short, use the description for more
    -- details. [required]
    author = "Found-sound Labs",

    -- URL relating to the author or their work.
    -- [optional, default: ]
    author_url = "https://example.com",

    -- The minor version of this library - backwards-compatible changes are
    -- allowed on a library; this field represents that. Non-backwards-compatibile
    -- changes are not allowed: you'd need to create a new library such as:
    -- "Strings 2".
    -- [optional, default: 1]
    minor_version = 1,

    -- Path relative to this script for the background image. It should be a jpg
    -- or png.
    -- [optional, default: ]
    background_image_path = "Images/background.jpg",

    -- Path relative to this script for the icon image. It should be a square jpg
    -- or png.
    -- [optional, default: ]
    icon_image_path = "Images/icon.png",
})
floe.new_instrument
Creates a new instrument on the library. It takes 2 parameters: the library object and a table of configuration. It returns a new instrument object. You can call this function multiple times to create multiple instruments.
An instrument is like a musical instrument. It is a sound-producing entity that consists of one or more samples (samples are specified in regions). Each library can have multiple instruments.
You can use Floe’s Tag Builder GUI to generate tag tables.
-- Creates a new instrument on the library. You can call this multiple times to
-- create multiple instruments.
local instrument = floe.new_instrument(library, {
    -- The name of the instrument. Must be unique. [required]
    name = "Metal Fence Strike",

    -- Specify a folder to group instruments under a common heading. It may
    -- contain slashes to represent a hierarchy. See
    -- https://floe.audio/develop/tags-and-folders.html for more information.
    -- [optional, default: no folders]
    folder = "Fences/Steel",

    -- A description of the instrument. Start with a capital letter an end with a
    -- period.
    -- [optional, default: no description]
    description = "Tonal pluck metallic pluck made from striking a steel fence.",

    -- An array of strings to denote properties of the instrument. See
    -- https://floe.audio/develop/tags-and-folders.html for more information.
    -- [optional, default: no tags]
    tags = { "found sounds", "tonal percussion", "metal", "keys", "cold", "ambient", "IDM", "cinematic" },

    -- Path to an audio file relative to this script that should be used as the
    -- waveform on Floe's GUI.
    -- [optional, default: first region path]
    waveform_audio_path = "Samples/file1.flac",
})
floe.add_region
Adds a region to an instrument. It takes 2 parameters: the instrument object and a table of configuration. Doesn’t return anything. You can call this function multiple times to create multiple regions.
A region is a part of an instrument. It defines an audio file and the conditions under which it will be played. For example, you might have a region that plays the audio file Piano_C3.flac when the note C3 is played. Each instrument must have one or more regions.
-- Adds a region to an instrument. You can call this multiple times to create
-- multiple regions. Each instrument must have one or more regions.
floe.add_region(instrument, {
    -- A path to an audio file, relative to this current lua file. [required]
    path = "Samples/One-shots/Resonating String.flac",

    -- The pitch of the audio file as a number from 0 to 127 (a MIDI note number).
    -- On a range from 0 to 127. [required]
    root_key = 60,

    -- How this region should be triggered.
    -- [optional, default: defaults]
    trigger_criteria = {
        -- What event triggers this region. Must be one of: "note-on" or
        -- "note-off".
        -- [optional, default: note-on]
        trigger_event = "note-on",

        -- The pitch range of the keyboard that this region is mapped to. These
        -- should be MIDI note numbers, from 0 to 128. The start number is
        -- inclusive, the end is exclusive.
        -- [optional, default: { 60, 64 }]
        key_range = { 60, 64 },

        -- The velocity range of the keyboard that this region is mapped to. This
        -- should be an array of 2 numbers ranging from 0 to 100. The start number
        -- is inclusive, the end is exclusive. Use the
        -- velocity_range_high_resolution instead if you need more than 100
        -- velocity layers.
        -- [optional, default: { 0, 100 }]
        velocity_range = { 0, 100 },

        -- Alternative to velocity_range that allows for 1000 velocity layers
        -- instead of 100.
        -- [optional, default: { 0, 1000 }]
        velocity_range_high_resolution = { 0, 1000 },

        -- Trigger this region only on this round-robin index. For example, if
        -- this index is 0 and there are 2 other groups with round-robin indices
        -- of 1 and 2 with the same round_robin_sequencing_group and
        -- trigger_event, then this region will trigger on every third press of a
        -- key only. round_robin_index should begin at 0 and be consecutive. The
        -- total number of round-robins is calculated automatically.
        -- [optional, default: no round-robin]
        round_robin_index = 0,

        -- Group together regions that have this same string, so that their
        -- round_robin_index is part of a separate sequence to other
        -- round_robin_sequencing_groups. Use this when you have multiple sets of
        -- regions that have a different number of round-robins with the same
        -- trigger_event.
        -- [optional, default: instrument-wide group]
        round_robin_sequencing_group = "group1",

        -- If another region in this instrument is triggered at the same time as
        -- this one and is overlapping this, and also has this option enabled,
        -- then both regions will play crossfaded in a proportional amount for the
        -- overlapping area, creating a smooth transition between velocity layers.
        -- Only works if there's exactly 2 overlapping layers.
        -- [optional, default: false]
        feather_overlapping_velocity_layers = false,

        -- For every region that has this same string, automatically set the start
        -- and end values for each region's key range based on its root key.
        -- [optional, default: no auto-map]
        auto_map_key_range_group = "group1",
    },

    -- Loop configuration.
    -- [optional, default: defaults]
    loop = {
        -- Define a built-in loop.
        -- [optional, default: no built-in loop]
        builtin_loop = {
            -- The start of the loop in frames. Inclusive. It can be negative
            -- meaning index the file from the end rather than the start.
            -- [required]
            start_frame = 24,

            -- The end of the loop in frames. Exclusive. It can be negative
            -- meaning index the file from the end rather than the start. 0 means
            -- the end of the file. [required]
            end_frame = 6600,

            -- The number of frames to crossfade. [required]
            crossfade = 100,

            -- The mode of the loop. Must be one of: "standard" or "ping-pong".
            -- [optional, default: standard]
            mode = "standard",

            -- If true, the start, end and crossfade values cannot be overriden by
            -- a custom loop from Floe's GUI.
            -- [optional, default: ]
            lock_loop_points = false,

            -- If true, the loop mode value cannot be overriden by a custom mode
            -- from Floe's GUI.
            -- [optional, default: ]
            lock_mode = false,
        },

        -- The requirement for this region to loop. Must be one of:
        -- "default" => Default looping behaviour.
        -- "always-loop" => This region will always loop - either using the built
        -- in loop, a user defined loop, or a default built-in loop.
        -- "never-loop" => This region will never loop even if there is a
        -- user-defined loop. Set all regions of an instrument to this to entirely
        -- disable looping for the instrument.
        -- [optional, default: default]
        loop_requirement = "always-loop",
    },

    -- Timbre layering configuration.
    -- [optional, default: no timbre layering]
    timbre_layering = {
        -- The start and end point, from 0 to 100, of the Timbre knob on Floe's
        -- GUI that this region should be heard. You should overlap this range
        -- with other timbre layer ranges. Floe will create an even crossfade of
        -- all overlapping sounds. The start number is inclusive, end is
        -- exclusive. This region's velocity_range should be the full range.
        -- [optional, default: no timbre layering]
        layer_range = { 0, 50 },
    },

    -- Audio properties.
    -- [optional, default: defaults]
    audio_properties = {
        -- Apply a gain to the audio data in decibels.
        -- [optional, default: 0]
        gain_db = -3,

        -- The number of frames to skip at the start of the audio data.
        -- [optional, default: 0]
        start_offset_frames = 0,

        -- Tune the audio data in cents.
        -- [optional, default: 0]
        tune_cents = 0,

        -- The number of frames to fade in the audio data.
        -- [optional, default: 0]
        fade_in_frames = 0,
    },

    -- Playback configuration.
    -- [optional, default: defaults]
    playback = {
        -- The requirement for keytracking. Must be one of: "default", "always" or
        -- "never".
        -- [optional, default: default]
        keytrack_requirement = "default",
    },
})
floe.add_named_key_range
Gives a name to a key range of this instrument. It takes 2 parameters: the instrument object and a table of configuration. Doesn’t return anything.
For example, with a multi-sampled keyboard instrument, you might mark the ranges beyond the natural range of the real instrument as "Extended" ranges. Alternatively, if the instrument contains multiple sounds, you can name each sound: "Kick", "Snare", etc.
You can call this multiple times to create multiple named key ranges.
-- Gives a name to a key range of this instrument. For example, with a
-- multi-sampled keyboard instrument, you might mark the ranges beyond the natural
-- range of the real instrument as "Extended" ranges. You can call this multiple
-- times to create multiple named key ranges. Alternatively, if the instrument
-- contains multiple sounds, you can name each sound: "Kick", "Snare", etc. Don't
-- overlap ranges.
floe.add_named_key_range(instrument, {
    -- The name of the key range. [required]
    name = "Extended Notes",

    -- The range of the keyboard to give a name to. These should be MIDI note
    -- numbers, from 0 to 128. The start number is inclusive, the end is
    -- exclusive. [required]
    key_range = { 80, 128 },
})
floe.add_ir
Adds a reverb impulse response to the library. It takes 2 parameters: the library object and a table of configuration. Doesn’t return anything. You can call this function multiple times to create multiple impulse responses.
-- Adds a reverb impulse response to the library. You can call this multiple times
-- to create multiple impulse responses.
floe.add_ir(library, {
    -- The name of the IR. Must be unique. [required]
    name = "Cathedral",

    -- File path to the impulse response file, relative to this script. [required]
    path = "irs/cathedral.flac",

    -- Specify a folder to group IRs under a common heading. It may contain
    -- slashes to represent a hierarchy. See
    -- https://floe.audio/develop/tags-and-folders.html for more information.
    -- [optional, default: no folders]
    folder = "Cathedrals",

    -- An array of strings to denote properties of the IR. See
    -- https://floe.audio/develop/tags-and-folders.html for more information.
    -- [optional, default: no tags]
    tags = { "acoustic", "cathedral" },

    -- A description of the IR. Start with a capital letter an end with a period.
    -- [optional, default: no description]
    description = "Sine sweep in St. Paul's Cathedral.",

    -- Audio properties.
    -- [optional, default: defaults]
    audio_properties = {
        -- Apply a gain to the audio data in decibels.
        -- [optional, default: 0]
        gain_db = -3,
    },
})
floe.set_attribution_requirement
Sets the attribution information for a particular audio file or folder. It takes 2 parameters: a path to the file or folder whose license information you want to set, and a table of configuration. If the path is a folder, the attribution requirement will be applied to all audio files in that folder and its subfolders.
-- Sets the attribution information for a particular audio file or folder. If the
-- path is a folder, the attribution requirement will be applied to all audio
-- files in that folder and its subfolders.
floe.set_attribution_requirement("Samples/bell.flac", {
    -- The title of the work. [required]
    title = "Bell Strike",

    -- Name of the license. [required]
    license_name = "CC-BY-4.0",

    -- URL to the license. [required]
    license_url = "https://creativecommons.org/licenses/by/4.0/",

    -- The name/identification of the persons or entities to attribute the work
    -- to. [required]
    attributed_to = "John Doe",

    -- URL to the original work if possible.
    -- [optional, default: ]
    attribution_url = "https://example.com",
})
floe.set_required_floe_version
Sets the minimum required version of Floe for this library. It takes one parameter: a string representing the version number (a semantic version).
It’s best to set this at the top of your floe.lua file so that Floe can check the version before running the script.
Calling this function is recommended so that older versions of Floe behave predictably when trying to load an unsupported library.
-- Sets the required Floe version for this library. If the current Floe version is
-- lower than the required version, an error will be raised.
floe.set_required_floe_version("1.0.6+1aa1a41a")
Support Function
Floe provides some additional functions to make developing libraries easier.
floe.extend_table
Extends a table with another table, including all sub-tables. It takes 2 parameters: the base table and the table to extend it with. The base table is not modified. The extension table is modified and returned. It has all the keys of the base table plus all the keys of the extended table. If a key exists in both tables, the value from the extension table is used.
Floe doesn’t have the concept of ‘groups’ like other formats like SFZ or Kontakt have. Instead, this function offers a way to apply a similar configuration to multiple regions. Alternatively, you can use functions and loops in Lua to add regions in a more dynamic way.
local group1 = {
    trigger_criteria = {
        trigger_event = "note-on",
        velocity_range = { 0, 100 },
        auto_map_key_range_group = "group1",
        feather_overlapping_velocity_regions = false,
    },
}

floe.add_region(instrument, floe.extend_table(group1, {
    path = "One-shots/Resonating String 2.flac",
    root_key = 65,
}))

floe.add_region(instrument, floe.extend_table(group1, {
    path = "One-shots/Resonating String 3.flac",
    root_key = 68,
}))
floe.midi_range_to_hundred_range and floe.midi_range_to_thousand_range
Floe prefers to use a range from 0 to 100 or 0 to 1000 (where the end value is exclusive, A.K.A. one-past the last) for velocity rather than MIDI 1.0’s typical range of 0 to 127 (where the end value is inclusive). These functions convert from the MIDI range to the Floe range. Useful when converting existing libraries to Floe.
-- Converts a MIDI note range (where the end value is inclusive) to Floe's 0-100
-- range (where the end value is exclusive, A.K.A, one-past the last). Takes a
-- table with two integers for start and end. Returns the same format but
-- remapped.
local hundred_range = floe.midi_range_to_hundred_range({ 0, 127 })
-- Converts a MIDI note range (where the end value is inclusive) to Floe's 0-1000
-- range (where the end value is exclusive, A.K.A, one-past the last). Takes a
-- table with two integers for start and end. Returns the same format but
-- remapped.
local thousand_range = floe.midi_range_to_thousand_range({ 0, 127 })
Lua Language Server
If you are using the Lua Language Server, you can get autocompletion and diagnostics for Floe’s Lua API by using the following configuration.
- Open Floe, and click on the 3-dot menu at the top of the window. Click “Library Developer Panel” and open the “Utilities” tab.
- Click on the “Install Lua definitions” button. This will generate the necessary file on your system.
- For the Lua LSP to find the definitions, you need to create a
.luarc.jsonfile in the same folder as yourfloe.luafile. - Paste the following code into the
.luarc.jsonfile:
{
    "runtime": {
        "version": "Lua 5.4"
    },
    "workspace": {
        "library": [
            "<< paste definitions file path >>"
        ]
    }
}
- Replace the string with the path that is copied to your clipboard when you click the “Copy Lua definitions path” button in the Library Developer Panel.
- Done.
Lua LSP Definitions
This file is also generated by the “Install Lua definitions” button in the Library Developer Panel.
---@meta FloeAPI

---@class FloeLibraryConfig
---@field name string The name of the library. Keep it short and use tagline for more details.
---@field tagline string A few words to describe the library.
---@field library_url? string The URL for this Floe library.
---@field description? string A description of the library. You can be verbose and use newlines (\n).
---@field author string Who created this library. Keep it short, use the description for more details.
---@field author_url? string URL relating to the author or their work.
---@field minor_version? number The minor version of this library - backwards-compatible changes are allowed on a library; this field represents that. Non-backwards-compatibile changes are not allowed: you'd need to create a new library such as: "Strings 2".
---@field background_image_path? string Path relative to this script for the background image. It should be a jpg or png.
---@field icon_image_path? string Path relative to this script for the icon image. It should be a square jpg or png.

---@class FloeInstrumentConfig
---@field name string The name of the instrument. Must be unique.
---@field folder? string Specify a folder to group instruments under a common heading. It may contain slashes to represent a hierarchy. See https://floe.audio/develop/tags-and-folders.html for more information.
---@field description? string A description of the instrument. Start with a capital letter an end with a period.
---@field tags? string[] An array of strings to denote properties of the instrument. See https://floe.audio/develop/tags-and-folders.html for more information.
---@field waveform_audio_path? string Path to an audio file relative to this script that should be used as the waveform on Floe's GUI.

---@class FloeImpulseResponseAudioPropsConfig
---@field gain_db? number Apply a gain to the audio data in decibels.

---@class FloeBuiltinLoopConfig
---@field start_frame number The start of the loop in frames. Inclusive. It can be negative meaning index the file from the end rather than the start.
---@field end_frame number The end of the loop in frames. Exclusive. It can be negative meaning index the file from the end rather than the start. 0 means the end of the file.
---@field crossfade number The number of frames to crossfade.
---@field mode? "standard"|"ping-pong" The mode of the loop.
---@field lock_loop_points? boolean If true, the start, end and crossfade values cannot be overriden by a custom loop from Floe's GUI.
---@field lock_mode? boolean If true, the loop mode value cannot be overriden by a custom mode from Floe's GUI.

---@class FloeRegionLoopConfig
---@field builtin_loop? FloeBuiltinLoopConfig Define a built-in loop.
---@field loop_requirement? "default"|"always-loop"|"never-loop" The requirement for this region to loop.

---@class FloeRegionAudioPropsConfig
---@field gain_db? number Apply a gain to the audio data in decibels.
---@field start_offset_frames? number The number of frames to skip at the start of the audio data.
---@field tune_cents? number Tune the audio data in cents.
---@field fade_in_frames? number The number of frames to fade in the audio data.

---@class FloeRegionTimbreLayeringConfig
---@field layer_range? number[] The start and end point, from 0 to 100, of the Timbre knob on Floe's GUI that this region should be heard. You should overlap this range with other timbre layer ranges. Floe will create an even crossfade of all overlapping sounds. The start number is inclusive, end is exclusive. This region's velocity_range should be the full range.

---@class FloeRegionPlaybackConfig
---@field keytrack_requirement? "default"|"always"|"never" The requirement for keytracking.

---@class FloeTriggerCriteriaConfig
---@field trigger_event? "note-on"|"note-off" What event triggers this region.
---@field key_range? number[] The pitch range of the keyboard that this region is mapped to. These should be MIDI note numbers, from 0 to 128. The start number is inclusive, the end is exclusive.
---@field velocity_range? number[] The velocity range of the keyboard that this region is mapped to. This should be an array of 2 numbers ranging from 0 to 100. The start number is inclusive, the end is exclusive. Use the velocity_range_high_resolution instead if you need more than 100 velocity layers.
---@field velocity_range_high_resolution? number[] Alternative to velocity_range that allows for 1000 velocity layers instead of 100.
---@field round_robin_index? number Trigger this region only on this round-robin index. For example, if this index is 0 and there are 2 other groups with round-robin indices of 1 and 2 with the same round_robin_sequencing_group and trigger_event, then this region will trigger on every third press of a key only. round_robin_index should begin at 0 and be consecutive. The total number of round-robins is calculated automatically.
---@field round_robin_sequencing_group? string Group together regions that have this same string, so that their round_robin_index is part of a separate sequence to other round_robin_sequencing_groups. Use this when you have multiple sets of regions that have a different number of round-robins with the same trigger_event.
---@field feather_overlapping_velocity_layers? boolean If another region in this instrument is triggered at the same time as this one and is overlapping this, and also has this option enabled, then both regions will play crossfaded in a proportional amount for the overlapping area, creating a smooth transition between velocity layers. Only works if there's exactly 2 overlapping layers.
---@field auto_map_key_range_group? string For every region that has this same string, automatically set the start and end values for each region's key range based on its root key.

---@class FloeFileAttributionConfig
---@field title string The title of the work.
---@field license_name string Name of the license.
---@field license_url string URL to the license.
---@field attributed_to string The name/identification of the persons or entities to attribute the work to.
---@field attribution_url? string URL to the original work if possible.

---@class FloeNamedKeyRangeConfig
---@field name string The name of the key range.
---@field key_range number[] The range of the keyboard to give a name to. These should be MIDI note numbers, from 0 to 128. The start number is inclusive, the end is exclusive.

---@class FloeImpulseResponseConfig
---@field name string The name of the IR. Must be unique.
---@field path string File path to the impulse response file, relative to this script.
---@field folder? string Specify a folder to group IRs under a common heading. It may contain slashes to represent a hierarchy. See https://floe.audio/develop/tags-and-folders.html for more information.
---@field tags? string[] An array of strings to denote properties of the IR. See https://floe.audio/develop/tags-and-folders.html for more information.
---@field description? string A description of the IR. Start with a capital letter an end with a period.
---@field audio_properties? FloeImpulseResponseAudioPropsConfig Audio properties.

---@class FloeRegionConfig
---@field path string A path to an audio file, relative to this current lua file.
---@field root_key number The pitch of the audio file as a number from 0 to 127 (a MIDI note number).
---@field trigger_criteria? FloeTriggerCriteriaConfig How this region should be triggered.
---@field loop? FloeRegionLoopConfig Loop configuration.
---@field timbre_layering? FloeRegionTimbreLayeringConfig Timbre layering configuration.
---@field audio_properties? FloeRegionAudioPropsConfig Audio properties.
---@field playback? FloeRegionPlaybackConfig Playback configuration.

---@class floe
floe = {}

-- Creates a new library. You should only create one library in your script.
-- Return the library at the end of your script.
---@param config FloeLibraryConfig
---@return lightuserdata library
function floe.new_library(config) end

-- Creates a new instrument on the library. You can call this multiple times to
-- create multiple instruments.
---@param library lightuserdata
---@param config FloeInstrumentConfig
---@return lightuserdata instrument
function floe.new_instrument(library, config) end

-- Adds a region to an instrument. You can call this multiple times to create
-- multiple regions. Each instrument must have one or more regions.
---@param instrument lightuserdata
---@param config FloeRegionConfig
function floe.add_region(instrument, config) end

-- Adds a reverb impulse response to the library. You can call this multiple times
-- to create multiple impulse responses.
---@param library lightuserdata
---@param config FloeImpulseResponseConfig
function floe.add_ir(library, config) end

-- Sets the attribution information for a particular audio file or folder. If the
-- path is a folder, the attribution requirement will be applied to all audio
-- files in that folder and its subfolders.
---@param file_path string
---@param config FloeFileAttributionConfig
function floe.set_attribution_requirement(file_path, config) end

-- Gives a name to a key range of this instrument. For example, with a
-- multi-sampled keyboard instrument, you might mark the ranges beyond the natural
-- range of the real instrument as "Extended" ranges. You can call this multiple
-- times to create multiple named key ranges. Alternatively, if the instrument
-- contains multiple sounds, you can name each sound: "Kick", "Snare", etc. Don't
-- overlap ranges.
---@param instrument lightuserdata
---@param config FloeNamedKeyRangeConfig
function floe.add_named_key_range(instrument, config) end

-- Sets the required Floe version for this library. If the current Floe version is
-- lower than the required version, an error will be raised.
---@param version_string string
function floe.set_required_floe_version(version_string) end

-- Extends a table with another table, including all sub-tables. The base table is
-- not modified. The extension table is modified and returned with all keys from
-- both tables. If a key exists in both, the extension table value is used.
---@param base_table table
---@param t table
---@return table extended_table
function floe.extend_table(base_table, t) end

-- Converts a MIDI note range (where the end value is inclusive) to Floe's 0-100
-- range (where the end value is exclusive, A.K.A, one-past the last). Takes a
-- table with two integers for start and end. Returns the same format but
-- remapped.
---@param midi_range table
---@return table hundred_range
function floe.midi_range_to_hundred_range(midi_range) end

-- Converts a MIDI note range (where the end value is inclusive) to Floe's 0-1000
-- range (where the end value is exclusive, A.K.A, one-past the last). Takes a
-- table with two integers for start and end. Returns the same format but
-- remapped.
---@param midi_range table
---@return table thousand_range
function floe.midi_range_to_thousand_range(midi_range) end

_G.floe = floe
Develop Preset Packs
Developing preset packs is simply a matter of saving preset files into a folder and then packaging them into a Floe Package.
Best practices for presets:
- Make presets all feel the same volume: the master peak meter on Floe’s GUI should just be the yellow zone when the preset is played at its fullest.
- Give each preset a unique, descriptive name suggesting its tone or usage. Don’t use all capital letters. Don’t include a ‘type’ prefix such as “PAD - “ or “LD - “.
- Add as many tags as is relevant to the preset. Read more about tags on the tags and folders page.
- Keep the description short and ending with a period.
- Organise presets into folders using your file browser. You can rename presets and folders as you like. See the best practises for folders on the tags and folders page.
Package libraries & presets for distribution
The easiest and most reliable way to distribute your Floe content is with Floe Packages.
Floe Packages are ZIP files containing sample libraries (which provide instruments and IRs) and/or presets (ready-to-use professional sounds). Packages are what users download and install into Floe.
Floe offers an easy-to-use GUI for installing packages. This installation process carefully considers existing content, versions, installation preferences, and whether installed libraries have been modified. The result should ‘just work’ or provide clear instructions on what to do next.
As with Floe’s sample library format, openness is key. That’s why Floe Packages are just normal ZIP files with a specific structure. Anyone can create them and anyone can open them. Additionally, it gives the user the option to extract them manually rather than use Floe’s GUI if they wish.
Create Floe Packages using our command-line tool or any ZIP program.
Packager command-line tool
If you’re comfortable with such things, we have a command-line tool to create Floe Packages. It ensures everything is set up correctly and adds a couple of nice-to-have features, particularly for users who want to install the package manually rather than with Floe’s GUI.
However, you can use any ZIP program to create Floe Packages. Just make sure they follow the structure described in the next section.
Download
Floe Packager Windows:
Download Floe-Packager-v1.0.6-Windows.zip (11 MB)Floe Packager macOS Apple Silicon:
Download Floe-Packager-v1.0.6-macOS-Apple-Silicon.zip (1 MB)Floe Packager macOS Intel:
Download Floe-Packager-v1.0.6-macOS-Intel.zip (1 MB)
Download the program, extract it, and run it from the command line.
Usage
Here’s the output of floe-packager --help:
Takes libraries and presets and turns them into a Floe package file (ZIP).
Also accepts existing packages to merge into the output package.
You can specify multiple libraries and preset-folders. Additionally:
- Validates any Lua files.
- Ensures libraries have a License file.
- Adds an 'About' document for each library.
- Adds a 'Installation' document for the package.
- Embeds a checksum file into the package for better change detection if the package
  is installed manually.

Usage: floe-packager [ARGS]

Optional arguments:
  --library-folders <path>...  One or more library folders
  --presets-folders <path>...  One or more presets folders
  --input-packages <path>...   One or more input package files to include in the output package
  --output-folder <path>       Folder to write the created package to
  --package-name <name>        Package name - inferred from library name if not provided
  --output-info-json <path>    If set, writes a JSON file with comprehensive package information: instruments, presets, tags, etc.
Examples
These examples use bash syntax.
# Creates a Floe Package from the Slow library and the Slow Factory Presets.
# Slow and "Slow Factory Presets" are folders in the current directory.
./floe-packager --library-folders "Slow" \
                --preset-folders "Slow Factory Presets" \
                --output-folder .

# Creates a Floe Package containing multiple libraries and no presets
./floe-packager --library-folders "C:/Users/Sam/Floe-Dev/Strings" \
                                  "C:/Users/Sam/Floe-Dev/Common-IRs" \
                --output-folder "C:/Users/Sam/Floe-Dev/Releases" \
                --package-name "FrozenPlain - Strings"
Package structure
If you’re not using the packager tool, you need to know the structure of the Floe Package. It’s very simple.
Requirements of a floe package:
- The ZIP must contain a folder called
Librariesand/or a folder calledPresets. If present, these folders must contain the libraries and presets respectively.
Be careful that your ZIP program is not adding an extra folder when you create the ZIP file. There should not be a top-level folder in the ZIP file, just the Libraries and/or Presets folders.
Example: single library & factory presets
📦FrozenPlain - Arctic Strings Package.zip/
├── 📁Libraries
│   └── 📁Arctic Strings
│       ├── 📄arctic-strings.floe.lua
│       ├── 📁Samples
│       │   ├── 📄strings_c4.flac
│       │   └── 📄strings_d4.flac
│       └── 📁Images
│           ├── 📄background.png
│           └── 📄icon.png
└── 📁Presets
    └── 📁Arctic Strings Factory
        ├── 📁Realistic
        │   ├── 📄Octaved.floe-preset
        │   └── 📄Soft.floe-preset
        └── 📁Synthetic
            ├── 📄Bright.floe-preset
            └── 📄Warm.floe-preset
Example: multiple libraries
📦Audioata - Synthwave Bundle Package.zip/
├── 📁Libraries
│   ├── 📁Synthwave Bass
│   │   ├── 📄synthwave-bass.floe.lua
│   │   └── 📁Samples
│   │       ├── 📄bass_c1.flac
│   │       └── 📄bass_d1.flac
│   ├── 📁Synthwave Drums
│   │   ├── 📄synthwave-drums.floe.lua
│   │   └── 📁Samples
│   │       ├── 📄kick.flac
│   │       └── 📄snare.flac
│   └── 📁Synthwave Synths
│       ├── 📄synthwave-synths.floe.lua
│       └── 📁Samples/
│           ├── 📄synth_c4.flac
│           └── 📄synth_d4.flac
└── 📁Presets
    └── 📁Synthwave Factory
        ├── 📄Clean Pad.floe-preset
        ├── 📄Dirty Lead.floe-preset
        ├── 📄Nebula Drone.floe-preset
        ├── 📄Punchy Kickdrum.floe-preset
        ├── 📄Backing FX.floe-preset
        └── 📄Full Effect.floe-preset
Tags and folders
Floe has 2 complimentary features for browsing, searching and filtering: tags and folders. Presets, instruments, and impulse responses all use tags and folders.
For developers, there are best practises for how to use tags and folders to offer the best experience for the user.
On this page, we use the term ‘item’ to mean either preset, instrument, or impulse response: these all use tags and folders in a similar way.
Folders
Folders are used to group items under a common heading.
Folders should be categories that relate to the theme or objective of the library. For example, for Lost Reveries, we wanted to explore the technique of using three complimentary timbres to layer into a full-spectrum sound, so we choose folders: “Low”, “Mid” and “Air”. Another example might be a library of field recordings, folders might be “Urban/London”, “Urban/York” or “Nature/New Forest”.
Folders may contain slashes to represent a hierarchy, just like a filepath. For example: “Piano/1978 Steinway”. Use this to specify broad categories that narrow down to specific categories. It’s not usually best to have more than 2 levels of hierarchy.
It’s best to have 5 to 30 items per folder. Folders with only a couple of items clutter the GUI and don’t offer much value. Folders with too many items loose their focus.
Folders might overlap with tags but, in general, they are more abstract and can use phrases that only make sense in the context of the library as a whole. However, if it makes sense to group items under a common heading such as ‘Percussion’ (a common tag), then that’s fine too — but you should also add this as a tag.
Tags
Tags are the properties of an item. They are used for filtering and searching items across all libraries. Therefore, tags should normally come from the standard pool of tags so that there is a common language that enables standard usage across all libraries. Custom tags are allowed, but they should only be used for a good reason.
Add as many relevant tags as possible.
Tags are case-insensitive.
Instrument tags
Instrument tags are set in the sample library’s Lua file when calling floe.new_instrument. However, writing tags manually is quite laborious.
Floe has a utility that allows you to use the GUI to select tags. It will write these tags as Lua code, ready to be included in your floe.lua file.
Lua/instrument_tags.lua:
-- This file is generated by Floe's tag builder.
return {
  ["Air - Restless Canopy"] = { "ambient", "bittersweet", "breathy", "dreamy", "ethereal", "nostalgic", "resonant", "smooth", "synthesized", "texture", },
  -- ...
}
floe.lua:
local instrument_tags = dofile("Lua/instrument_tags.lua")

-- ...

local instrument_name = "Air - Restless Canopy"
local instrument = floe.new_instrument(library, {
    name = instrument_name,
    tags = instrument_tags[instrument_name],
    -- ...
})
This Tag Builder is found by clicking on the 3-dots menu at the top of Floe, and then selecting “Library Developer Panel”.
The tag builder works for whatever instrument is loaded in the first layer of Floe. As you click on tags, the generated Lua code will be placed in the library’s folder in a subfolder called Lua.
Standard tags
We take a pragmatic approach to defining this set of standard tags. Rather than try to be completely comprehensive and technically accurate, we instead aim to strike a balance between correctness and common usage within the music production space. The goal of tags is to help users find the item they need. You can suggest edits to this list via Github or other means.
For best results setting tags, go over each of the following questions and add all tags that apply to the item.
1. 🔊 Sound source: Where did the sound come from?
| Tag | Description |
|---|---|
acoustic | Originating from a real instrument |
field recording | Environmental or location recordings |
found sounds | Real objects not traditionally used for music |
hybrid | Combines acoustic/vocal sounds with processed/synthesized elements |
synthesized | Generated by algorithms or circuits |
vocal | Originating from a human voice |
It’s strongly recommended to specify a sound-source for instruments and impulse responses. This is sometimes not applicable for presets.
2. 🎻 Real instrument category: Does it fit in a real instrument category?
brass, cello, choir, double bass, drums, electric bass, folk, guitar, keyboard, organ, percussion, piano, plucked strings1, strings2, struck strings3, tonal percussion, violin, wind.
These are mostly relevant for acoustic or hybrid sounds, but can be used for synthesized sounds that emulate these instruments.
3. 👥 Number of players: How many players are involved?
| Tag | Description |
|---|---|
solo | Single player |
ensemble | Multiple players |
This is typically used for acoustic sounds. Synthesized sounds usually don’t have this tag.
4. ➡️ Sound type (long duration): What type of sound is it?
| Tag | Description |
|---|---|
pad | Sustained, pitched background harmonic element |
texture | Sustained atmospheric element, typically less of a musical pitch than pad |
soundscape | Complex and rich sonic environment |
underscore | Background tones or sequences for underneath dialogue |
noise | Non-pitched and constant, similar to white noise |
5. ↔️ Sound type (short duration): What type of sound is it?
| Tag | Description |
|---|---|
hit | Single impactful sound with pitch and percussive elements |
keys | Piano or keyboard-like |
oneshot | Non-looping single sound, typically not for playing chromatically |
pluck | Short melodic notes |
stab | Extra-short melodic notes |
6. 🔁 Sound type (sequence or pattern): What type of sound is it?
| Tag | Description |
|---|---|
arp | Arpeggiated pattern of notes |
sequence | Sequenced pattern timbre changes |
loop | Sampled repeating phrase |
7. 🎛️ Sound type (role in a track): What type of sound is it?
| Tag | Description |
|---|---|
lead | Foreground melodic element |
bass | Low-frequency foundation |
riser | Building tension element |
downer | Descending tension element |
sound fx | Special effect sound |
transition | Section change element |
8. 🪵 Material: Is it made from a specific material?
glass, ice, metal, plastic, rubber, stone, wood.
This is typically used for non-standard instruments in the acoustic or found sounds categories.
9. 🏛️ Reverb type: What reverb type is it?
cathedral, chamber, church, hall, large room, open air, small room, studio, unusual.
Strongly recommended for impulse responses. Not applicable for instruments or presets.
10. 🙂 Mood (positive): What mood does the item evoke?
bright4, dreamy, ethereal, hopeful, nostalgic, peaceful, playful.
It’s usually recommended to specify moods for synthesised instruments and presets. Not typically used for well-known acoustic instruments.
11. 😟 Mood (negative): What mood does the item evoke?
aggressive, chaotic, dark5, disturbing, eerie, melancholic, menacing, tense.
It’s usually recommended to specify moods for synthesised instruments and presets. Not typically used for well-known acoustic instruments.
12. 😐 Mood (mixed): What mood does the item evoke?
bittersweet, hypnotic, mysterious, quirky, subdued.
It’s usually recommended to specify moods for synthesised instruments and presets. Not typically used for well-known acoustic instruments.
13. 🎭 Mood (thematic): What mood does the item evoke?
dramatic, dystopian, epic, experimental, fantasy, heroic, noir, romantic, thriller, horror, sci-fi, western.
It’s usually recommended to specify moods for synthesised instruments and presets. Not typically used for well-known acoustic instruments.
14. 🎶 Pitch: What are its pitch characteristics?
| Tag | Description |
|---|---|
multi-pitched | Contains multiple distinct notes |
non-pitched | Lacks identifiable musical pitch |
dissonant | Contains harmonically clashing pitches |
Useful for non-typical sounds that have notable pitch characteristics. A sound is assumed to possess a musical pitch unless otherwise stated.
15. 🚂 Timbre (modulation): What is its timbre like?
| Tag | Description |
|---|---|
pulsing | Rhythmic modulation |
evolving | Changing over time |
glitched | Digital error artefacts |
grainy | Fine textural irregularities |
16. 🎷 Timbre (real instrument tone): What is its timbre like?
| Tag | Description |
|---|---|
brassy | Like brass instruments |
breathy | Containing air noise, like wind instruments |
strings-like | Characteristic resonance of string instruments |
reedy | Characteristic of reed instruments |
choir-like | Characteristic of choral voices |
organ-like | Characteristic of an organ |
percussive | Short, sharp attack |
17. 🎚️ Timbre (synthesis technique): What is its timbre like?
| Tag | Description |
|---|---|
analog | Warm, imprecise, vintage character |
FM | Frequency modulation synthesis |
granular | Granular synthesis |
physical modelling | Simulating real-world physics |
18. 💎 Timbre (frequency): What is its timbre like?
| Tag | Description |
|---|---|
airy | Open, spacious, light |
circuit bent | Characteristic of modified electronic devices |
cold | Thin, clinical, lacking warmth |
digital | Clean, precise, computer-generated character |
distorted | Overdriven, crushed, non-linear |
full-spectrum | Wide frequency range |
fuzzy | Indistinct, soft-edged, unclear |
glassy | Clear, fragile, transparent |
gritty | Rough, textured, unpolished |
harsh | Abrasive, aggressive high frequencies |
hissing | Sibilant, white noise |
lo-fi | Intentionally degraded quality |
lush | Full, rich, densely layered |
metallic | Resonant, hard, bright, like metal |
muddy | Unclear low-mid frequencies |
muffled | Dampened high frequencies |
nasal | Strong mid-range resonance |
noisy | Contains noise components, imperfect. If the sound is 100% noise use noise instead. |
pure | Free from noise, clean sine-like quality |
resonant | Strong resonant peaks in frequency |
rumbly | Low frequency non-pitch sustained noise |
saturated | Subtly distorted, harmonically enhanced |
smooth | Even, consistent, without sharp edges |
thin | Lacking in fullness, narrow frequency range |
warm | Rich in harmonics, pleasant mid-range |
19. 🎵 Genre: What genres might this item fit best into?
80s, EDM, IDM, ambient, blues, chillout, chiptune, cinematic, disco, downtempo, drum & bass, dubstep, electronic, folk (genre), funk, future bass, glitch, hip-hop, house, industrial, jazz, lo-fi6, metal (genre), orchestral, pop, rock, synthwave, techno, trance, trap, vaporwave, world.
Specifying at least one genre is recommended for all presets and instruments.
-
Plucked strings such as guitar, harp, mandolin ↩
-
Bowed strings such as violin, viola, cello, double bass ↩
-
Struck strings such as hammered dulcimer, santur ↩
-
Positive, uplifting, clear ↩
-
Unhappy, dim, unpleasant ↩
-
Intentionally degraded quality ↩
Mirage Compatibility
Floe includes full compatibility with Mirage, a sample library platform developed by FrozenPlain from 2018 to 2024. Floe evolved from this foundation while expanding into open-source development and broader platform compatibility.
Technical Details
Mirage libraries use a custom .mdata binary format for storing samples and metadata. The Mirage Compatibility package provides additional assets such as images and audio files that were previously embedded within Mirage but are handled separately in Floe. This package is automatically included with FrozenPlain’s Mirage-format products and is also available separately on the packages page if needed.
Floe automatically detects existing Mirage installations and loads libraries without requiring conversion or reinstallation. Both Mirage and Floe can coexist on the same system without conflicts.
For information about FrozenPlain’s transition from Mirage to Floe, including product catalogue details and customer migration guidance, see FrozenPlain’s transition page.
Roadmap
Floe is an ongoing project that will have lots of backwards-compatible updates. We want to be able to release new features and improvements as soon as they’re ready.
- Finish VST3 and AU support
- Complete the GUI for adding multiple libraries to a single instance
- Recreate the presets infrastructure and GUI
- Comprehensive testing of all plugin formats in all DAWs and operating systems
- Prepare a couple of Floe sample libraries ready for release
- Ability to split layers to different ranges on the keyboard
- Implement pitchbend
- Macro parameters
Later down the line, we’re hoping to:
- Refresh the GUI: make it more consistent and performant, and refactor the code for easier expansion
- Support MPE, MIDI2 and polyphonic modulation
- Add more features to the Lua sample library format to allow for more complex instruments: legato, key-switches, drums, etc.
Even further down the line, we’re investigating ideas such as:
- Allow for creating custom GUIs ‘views’ using the library Lua API
- Adding wavetable oscillators/granular synthesis as an option to layer with sampled instruments
- Adding a more comprehensive modulation system
- Granular synthesis
Give us feedback on these using Github’s discussions section. FrozenPlain also have a Floe section on their forum.
Changelog
1.0.6
- Add Reset Audio Engine to the menu for stopping all sound and voices
- macOS installer: use different method to try and avoid ‘cannot install to system volume’ error
- Fix rare crash when shutting down Floe on macOS when file-picker is open
- Fix rare crash when host sends an out-of-bounds parameter value
- Fix ‘library not found’ error message repeating itself
- Fix hover effect for tag button on the Save panel
1.0.5
- Fix issue where mute/solo buttons sometimes wouldn’t correctly work
- Website: improve download page layout
- Add additional check for existing Mirage folders, and add ability to run this manually from the menu
- Fix potential crash when host has a tempo near to 0 BPM
1.0.4
- Add Linux support - CLAP and VST3
1.0.3
- Fix issue with Bitwig, where presets wouldn’t sometimes load completely
- Fix crackle possible crackle in audio when host uses an odd-sized audio buffer
- Fix rare crash when MDATA file is corrupted
1.0.2
- Tweak the smoothing of very short attack times to allow for more sharpness
- GUI: show more decimal places on parameters for less than 10 ms
1.0.1
- Fix crackle in audio when the hosts use audio buffers that are not a multiple of 32 frames.
- Fix crackle in Bitwig Studio due to the host not correctly using the thread_pool extension.
1.0.0
- Ready for widespread use.
0.12.2-beta
- Fix sample offset start being too large and triggering an assertion failure
0.12.1-beta
- Fix pops and clicks related to note-starting: a regression introduced in 0.12.0-beta
0.12.0-beta
- Macros parameters:
- Bottom GUI panel now has tabs: Play and Macros
- Macros parameters allow for controlling multiple other parameters at once with a single knob and with a custom name
- On the Macros tab, you can add and remove the parameters that are linked to each macro and control the strength of the link
- Add pitch wheel support: configure the bend range using the ‘Pitch Bend Range’ parameter on each layer.
- Add key range controls for splitting the keyboard into zones for each layer. These ranges are shown above the keyboard. They are controlled using new parameters on the Play tab of each layer.
- Fix velocity curves being clear when randomising parameters
- Add more information to the velocity curve tooltips
- New documentation pages for velocity curves
- Include instrument/preset descriptions in tooltips for open-picker buttons
- Fix window size jumping if the width was exactly 1000 pixels
- Fix jumps when first grabbing the resize corner
- Improve smoothness of audio processing when using parameter automation; Floe’s engine now processes parameter changes at a fixed interval of 32 frames.
- Slightly improve top and bottom panel layout and colours
- Fix noise caused by reverb history not being cleared when loading a preset
- Library creation: support more than 100 velocity layers and add helper functions
midi_range_to_hundred_rangeandmidi_range_to_thousand_range
0.11.3-beta
- Revert unintended change in intensity of Atan distortion in version 0.11-0 - unfortunately this will make presets/DAW projects (created using Floe 0.11.0-0.11.2) sound different if they used Atan distortion.
- Fix regression where GUI might not update when sound is playing
- Library creation: add audio_properties for impulse response for setting gain_db for IRs
0.11.2-beta
- Fix rare crash when resizing the GUI to a very small size
- Improve UI size control on the preferences panel so that incrementing/decrementing feels more significant
- Fix memory leak
0.11.1-beta
- Add sitemap.xml for the website
- Improve the website homepage, installation, mirage, packages, roadmap pages.
- Packager tool:
- Add ability to merge multiple packages into one
- Add ability to output a JSON file with comprehensive information about the package
- Improve error reporting: show RAM, let Sentry decide on fingerprint, fix getting reports of crashes from outside of the plugin
- Fix a whole bunch of rare crashes
- Windows: fix uninstaller not uninstalling some small files
0.11.0-beta
- Add new velocity -> volume curve for each layer. This replaces the old mapping buttons and the master ‘Velo’ button. There’s now much more control. The old parameters are available in a new ‘legacy’ parameters section but are no longer used unless loading a DAW preset that uses them.
- Add new algorithms to distortion: foldback, rectifier and ring-modulator
- Fix LFO and delay time not updating with the tempo
- Reduce pops and clicks with high-frequency LFOs, sharp changes in ADSR and some parameter changes
- GUI: improve picker panels behaviour:
- Background darkens when panel is open
- New close button on the top right
- Remove unnecessary padding around the picker content
- Single-click loads an item, double-click loads and closes the picker panel
- Add right-click menu on libraries with option to open the library folder
- Add right-click menu to presets and preset folders with option to open the folder, or delete the preset
- Improve menus:
- Add left/right buttons to all menus on the GUI
- Allow most menus to be dragged like a slider to change the value
- Add randomise button to convolution IR menu as well as left/right buttons
- Make all left/right buttons on the UI the same style
- Move the left/right buttons to the right of the menu so it’s consistent and easy to click forward and back without having to move the mouse long distances
- Make the UI window size buttons consistent with the left/right buttons
- GUI: show loop points if an instrument has a single sample with built-in loop
- GUI: add resize corner to the bottom right of the GUI window
- Add missing tooltips for some preferences
- Work-around CLAP Studio One not using the correct threads
- GUI: right-click menu for the IR picker with ‘unload IR’ option
- GUI: don’t show markers on ADSR when it’s inactive
- GUI: Instrument pickers now have their own stat for filters (libraries, tags, etc.) allowing for more flexibility particularly with the randomise buttons
- GUI: remove option to show/hide the keyboard. It’s not often used, and coming soon are new features that only make sense with the keyboard shown.
- Fix crash when changing tabs on the ‘Legal’ tab of the Info panel
- Fix presets picker not showing nesting of folder on Windows
- Fix rare crash when loading a library on Windows
0.10.3-beta
- Sample library creation: add ‘fade_in_frames’ to add_region
- GUI: remove the status panel from the picker panels, instead, items show a tooltip when hovered for a moment. This make the picker panels less cluttered and fixes the issue where the text would be too long to fit in the status panel.
- GUI: make sections in the picker panel collapsible
- GUI: improve the layout of the picker panel filters
0.10.2-beta
- Fix issue where layer volume would be automatically MIDI learned
- Fix some persistent MIDI CCs not being applied
0.10.1-beta
- Replace ‘Reset all parameters’ option with ‘Reset State’ which also clears things such as instruments.
- Fix crash with floe-package when using relative paths
- Fix possible error with installing/opening preset-picker
- Fix a set of possible rare errors
0.10.0-beta
- Picker panels:
- Add filters for folders (tree view)
- Put tags into categories and add icons
- Add 2 filter modes: match-all and match-any, allowing for more powerful filtering. Every filter button has a label showing the number of matching items that dynamically updates as you change the filters.
- Fix instrument picker not showing waveform instruments when no Mirage libraries installed
- Show library icons for each library used by a preset
- Show (?) icon for missing libraries
- Add
<untagged>filter for items that don’t have any tags
- Add “Library Developer Panel” on the GUI with tag-builder tool for generating instrument tags in Lua.
- Add right-click menu to the instrument picker button with ‘unload instrument’ option.
- Add lock/unlock mode for Save Preset panel for allowing changing presets with it still open
- Sample library creation: add support for multiple Lua files by using
dofile() - Sample library creation: add set_required_floe_version function
- Sample library creation: add generated Floe API definition file for Lua Language Server allowing for code completion and documentation as you type - available on the Library Developer Panel
- GUI: slightly improved icons
- GUI: use same toggle icon for all toggle buttons
- GUI: make mute/solo buttons more obvious when they’re on
- Fix mute/solo buttons not greying out layers
- Fix cases where mute/solo button would get stuck on
- Fix preset selection buttons not working on the first click due to the scanning not having started. Now, scanning begins when the cursor is hovering over the button.
0.9.9-beta
- Sample library creation: add start_offset_frames to add_region
- Sample library creation: add tune_cents to add_region
- Normalise waveform GUI so that quiet samples are easier to see
- Fix rare crash related to sample library folder scanning
0.9.8-beta
- Fix rare error on Windows when closing the GUI when there’s a file picker open
- Fix rare errors in some VST3 hosts
- Fix rare crash related to sample library folder scanning
0.9.7-beta
- Fix rare crash related to closing the GUI on Floe AU
- Fix rare crash related to library images
- Fix rare crash related to voice stealing
- Fix edge cases related to file paths on Windows
0.9.6-beta
- Check for updates on startup; a small indicator on the Info button will appear - leading to more information on the Info panel. Can be disabled in the preferences.
- Fix file picker on Windows not opened when there’s missing folders
- Fix rare crash in Floe AU in Ableton Live
0.9.5-beta
- Fix potential crash in Floe AU format
- Fix errors related to filesystem watching on Windows
- Fix error related to sample library folders - could happen when installing a package
0.9.4-beta
- Offer separate downloads for Intel and Apple Silicon Macs rather than a universal binary, this reduces the size of the download to ~50 MB.
- Fix missing diagnostic information on macOS
0.9.3-beta
- Fix more errors with threads
- Fix memory leaks
- Fix some edge cases with certain hosts
- Improve automatic error reporting allowing us to fix bugs faster
- Protect against hosts that try to use multiple main threads
0.9.2-beta
- Slightly improve performance of Intel Mac builds
- Fix crash with Intel Mac builds
- Fix errors with threads
0.9.1-beta
- AU: fix crash when trying to open the file/folder picker
- Fix missing logo on macOS
0.9.0-beta
- Library creation: fix specifying loop end points relative to the end of the file.
- Library creation: replace always_loop, never_loop field with enum
loop_requirement. - Library creation: add round_robin_sequencing_group field to allow for different sets of variations.
- Library creation: separate note-off round-robin sequencing group from note-on round-robin sequencing group.
- Library creation: disable volume envelope for note-off regions
- Library creation: improve memory usage when reading Lua scripts
- Library creation: fix crash when an image file is empty
- VST3: fix not responding to note-on/note-off messages when they weren’t on channel 0
- GUI: on the Save Preset dialog, add the ability to store/load a preset author
- GUI: make the Save Preset dialog larger and scroll to top when a new preset is loaded
- Fix potential crash when reporting an error
- Rename parameter right-click menu Set Value to Enter Value
- Support CLAP reset() function
0.8.3-beta
- Fix crash when error occurs in the Windows native file picker
- Fix crash when given invalid arguments to CLAP activate
- Fix crash when opening VST3 in FL Studio on Windows
0.8.2-beta
- Fix crash when trying to randomise instruments, presets or IRs when there’s only one of them
- Fix presets folder still showing tags after a folder is removed. #120
- Fix crash when first opening the GUI
0.8.1-beta
See the main release notes.
- Fix issue where Mirage and Floe libraries with the same name would conflict
0.8.0-beta
First beta release of Floe. This release is feature-complete. We are looking for feedback on the new features and any bugs you find.
- Add AU (Audio Unit v2) support
- Brand new instrument browser supporting tags, search, and filtering by library
- Brand new impulse response browser featuring all the options of the instrument browser
- Brand new preset browser with tags, search, and filtering by library. Preset metadata is tracked, library information is tracked, file changes are detected, duplicate presets are hidden.
- New built-in convolution reverb impulse library with 33 impulse responses
- New save preset dialog with author, description, and tags
- Fix instrument left/right and randomise buttons
- Fix instance ID not retaining
- Fix freeze when trying to resize GUI
- Fix GUI opening but only ever showing black
- Fix randomise parameters
Note: we have jumped from 0.0.7 to 0.8.0. This is to signify the change from alpha to beta but also because it wasn’t really right in the first place only incrementing by the patch number. To make the jump obvious we start the minor version at 0.8.0 rather than 0.1.0.
0.0.7-alpha
The focus of this version has been bug fixes; in particular around loading Mirage libraries and presets.
- Max voice is increased from 32 to 256 allowing for more complex instruments
- Show the instrument type on the GUI: single sample, multisample or oscillator waveform
- Rename ‘Dynamics’ knob to ‘Timbre’ and fix its behaviour - for instruments such as Arctic Strings, it can be used to crossfade between different sets of samples.
- Fix missing code signing on Windows installer resulting in ‘Unknown Publisher’ warning
- Fix layer filter type menu being the incorrect width
- Fix crash when loop points were very close together
- Improve loop modes on GUI: it’s obvious when a loop is built-in or custom, what modes are available for a given instrument, why loop modes are invalid.
- Add docs about looping
- Fix sustain pedal incorrectly ending notes
Mirage loading:
- Fix incorrect loading of Mirage on/off switches - resulting in parameters being on when they should be off
- Fix incorrect handling of Mirage’s ‘always loop’ instruments
- Fix incorrect conversion from Mirage’s effects to Floe’s effects
- Improve sound matching when loading Mirage presets
- Fix failure loading some FrozenPlain Squeaky Gate instruments
Library creation:
- Re-organise the fields for add_region - grouping better into correct sections and allowing for easier expansion in the future.
- Sample library region loops now are custom tables with
start_frame,end_frame,crossfadeandmodefields instead of an array. - Add
always_loopandnever_loopfields to sample library regions allowing for more control over custom loop usage on Floe’s GUI. - Show an error if there’s more than 2 velocity layers that are using ‘feathering’ mode. We don’t support this yet. Same for timbre layers.
0.0.6-alpha
- Add VST3 support
- Standardise how tags and folders will be used in instruments, presets and impulse responses: https://floe.audio/develop/tags-and-folders.html
- Fix sustain pedal
- Remove ‘retrig CC 64’ parameter from layer MIDI. This was mostly a legacy workaround from Mirage. Instead, we just use the typical behaviour that when you play the same note multiple times while holding the sustain pedal, the note plays again - stacking up.
- Fix package installation crash after removing folders
- Fix markers staying on ADSR envelope even when sound is silent
- Fix MIDI transpose causing notes to never stop
- Fix peak meters dropping to zero unexpectedly
- Fix not finding Mirage libraries/presets folders
0.0.5-alpha
- Fix text being pasted into text field when just pressing ‘V’ rather than ‘Ctrl+V’
- Windows: fix unable to use spacebar in text fields due to the host stealing the keypress
- Fix crash when trying to load or save a preset from file
- Improve the default background image
0.0.4-alpha
Fix crash when opening the preset browser.
0.0.3-alpha
Version 0.0.3-alpha is a big step towards a stable release. There’s been 250 changed files with 17,898 code additions and 7,634 deletions since the last release.
It’s still alpha quality, and CLAP only. But if you’re feeling adventurous, we’d love for you to try it out and give us feedback:
Error reporting has been a significant focus of this release. We want to be able to fix bugs quickly and make Floe as stable as possible. A part of this is a new a Share Feedback panel on the GUI - please use this!
Floe’s website has been filled out a lot too.
New/edited documentation pages:
- Floe support for using CC BY libraries
- Autosave feature added
- New error reports, crash protection, feedback form
- New uninstaller for Windows
Highlights
- Add new Info panel featuring info about installed libraries. ‘About’, ‘Metrics’ and ‘Licenses’ have been moved here too instead of being separate panels.
- Add new Share Feedback panel for submitting bug reports and feature requests
- Add attribution-required panel which appears when needed with generated copyable text for fulfilling attribution requirements. Synchronised between all instances of Floe. Makes complying with licenses like CC BY easy.
- Add new fields to the Lua API to support license info and attribution, such as CC BY
- Add lots of new content to floe.audio
- Add error reporting. We are now better able to fix bugs. When an error occurs, an anonymous report is sent to us. You can disable this in the preferences. This pairs with the new Share Feedback panel - that form can also be used to report bugs.
- Add autosave feature, which efficiently saves the current state of Floe at a configurable interval. This is useful for recovering from crashes. Configurable in the preferences.
- Add a Floe uninstaller for Windows, integrated into Windows’ ‘Add or Remove Programs’ control panel
- Preferences system is more robust and flexible. Preferences are saved in a small file. It syncs between all instances of Floe - even if the instances are in different processes. Additionally, you can edit the preferences file directly if you want to; the results will be instantly reflected in Floe.
- Improve window resizing: fixed aspect ratio, correct remembering of previous size, correct keyboard show/hide, resizable to any size within a reasonable range.
Other changes
- Add support for packaging and installing MDATA libraries (Mirage)
- Add tooltips to the preferences GUI
- Add ability to select multiple packages to install at once
- Rename ‘settings’ to ‘preferences’ everywhere
- Rename ‘Appearance’ preferences to ‘General’ since it’s small and can be used for other preferences
- Make notifications dismiss themselves after a few seconds
- Fix externally deleted or moved-to-trash libraries not being removed from Floe
- Fix not installing to the chosen location
- Fix Windows installer creating nonsense CLAP folder
- Fix packager adding documents into the actual library rather than the package
0.0.2
- Fix Windows installer crash
- Don’t show a console window with the Windows installer
- Better logo for Windows installer
- Remove unnecessary ‘Floe Folders’ component from macOS installer
0.0.1
This is the first release of Floe. It’s ‘alpha quality’ at the moment - there will be bugs and there are a couple of missing features. This release is designed mostly to test our release process.
This release only contains the CLAP plugin. The VST3 and AU plugins will be released soon.
Mirage
Floe used to be called Mirage. Mirage contained many of the same features seen in Floe v0.0.1. But there are large structural changes, and some new features and improvements:
- Use multiple different libraries in the same instance.
- CLAP version added - VST3 and AU coming soon, VST2 support dropped.
- New installer: offline, no account/download-tickets needed. Libraries are installed separately.
- Ability for anyone to develop sample libraries using new Lua-based sample library format. The new format features a new system to tag instruments and libraries. Hot-reload library development: changes to a library are instantly applied to Floe.
- New comprehensive documentation.
- Floe now can have multiple library and preset folders. It will scan all of them for libraries and presets. This is a much more robust and flexible way to manage assets rather than trying to track individual files.
- New, robust infrastructure:
- Floe settings are saved in a more robust way avoiding issues with permissions/missing files.
- Improved default locations for saving libraries and presets to avoid permissions issues.
- New format for saving presets and DAW state - smaller and faster than before and allows for more expandability.
- New settings GUI.
- Floe packages: a robust way to install libraries and presets. Floe packages are zip files with a particular layout that contain libraries and presets. In the settings of Floe, you can install these packages. It handles all the details of installing/updating libraries and presets. It checks for existing installations and updates them if needed. It even checks if the files of any existing installation have been modified and will ask if you want to replace them. Everything just works as you’d expect.
Technical changes:
- Huge refactor of the codebase to be more maintainable and expandable. There’s still more to be done yet though.
- New build system using Zig; cross-compilation, dependency management, etc.
- Comprehensive CI/CD pipeline for testing and creating release builds.
- New ‘sample library server’, our system for providing libraries and audio files to Floe in a fast, async way.