Looping
At a glance
- Each layer can loop its instrument while a note is held, either using loop points baked into the sample library or your own custom loop region.
- The available modes adapt to the loaded instrument: library authors can offer built-in loops, restrict which modes are usable, or disable looping altogether.
- Set on the Loop mode selector at the bottom of the layer's Playback tab; custom loop points are dragged directly on the waveform.
Loop modes
The Loop mode menu offers up to six choices, depending on what the loaded instrument supports:
- Instrument Default: use whatever the library author chose for each region — including no looping at all.
- Built-in Standard / Built-in Ping-Pong: use the library's built-in loop points, but force every loopable region into the chosen direction. Loop handles are shown on the waveform but are not editable.
- No Loop: don't loop, even if the instrument has built-in loops. Some libraries require looping (e.g. sustained pads) and will ignore this.
- Standard: custom wrap-around looping. When the playhead reaches the end of the loop, it jumps back to the start.
- Ping-Pong: custom looping that alternates between playing forwards and backwards through the loop region.
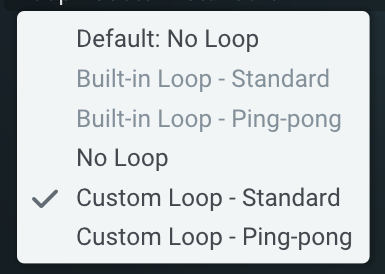
The custom modes are only available when the instrument allows user-defined loops. For multisampled instruments, the same loop region (as a percentage of each sample) is applied to every region.
Editing the loop region
When a custom mode is active, three handles appear on the waveform:
- Loop start and loop end: drag horizontally to set the loop boundaries. Double-click to type an exact value.
- Crossfade: drag to set the crossfade length. The shaded region of the waveform highlights the looped portion, and the crossfade is drawn as a sloped overlay at the boundary.
You can also drag inside the loop region itself to move the whole loop without resizing it. Enabling Reverse mirrors the entire display — the loop end appears on the left and the loop start on the right — but the underlying loop points are unchanged.
If the instrument has built-in loops that aren't editable, the handles are still drawn so you can see where the loop sits, but they're greyed out and can't be moved.
Crossfade
A crossfade smooths the boundary so you don't hear a click when the loop wraps. It usually helps to have a small crossfade enabled, especially for sustained or tonal material.
In Standard mode, the crossfade fades from a region just before the loop end into the loop start — the same audio is mixed against itself on either side of the wrap.
In Ping-Pong mode, the crossfade is applied at the turnaround points where the direction reverses.
Floe automatically clamps the crossfade length so it can never:
- Exceed the length of the loop region itself.
- Extend past the start of the sample (the crossfade needs audio before the loop start to fade in from).
- In ping-pong mode, extend past the end of the sample (the turnaround at the loop end also needs audio on both sides).
If you make the loop region smaller than the current crossfade, the crossfade shrinks to fit. The crossfade handle is hidden when the loop spans the whole sample, since there's no audio outside the loop to fade against.
Other playback controls
The same waveform also hosts two controls that aren't strictly part of looping but live alongside it:
- Sample start offset: the arrow handle at the bottom-left. Drag it to skip the first part of the sample. The skipped region is drawn in a dimmed colour.
- Reverse: a toggle below the waveform. Plays the sample (and any loop) backwards.
When the sample start is moved into the audio, it's a good idea to add a short attack on the volume envelope to avoid clicks.